7 Key Indicators for Torque Hinge Inspection (Procurement Guide)
In the procurement of industrial hardware, a Torque Hinge is not just a connector. It is the core component that controls the movement “feel” and positioning stability of a device.
Based on my years of experience assisting clients with supply chain quality issues, many buyers focus solely on price while ignoring detailed inspection standards.
This direct oversight often leads to production line stoppages or a terrible user experience with the final product.
To help you avoid these risks, I have compiled 7 key indicators that must be strictly checked during bulk inspection.
These recommendations are based on actual engineering cases and internationally accepted quality control standards.
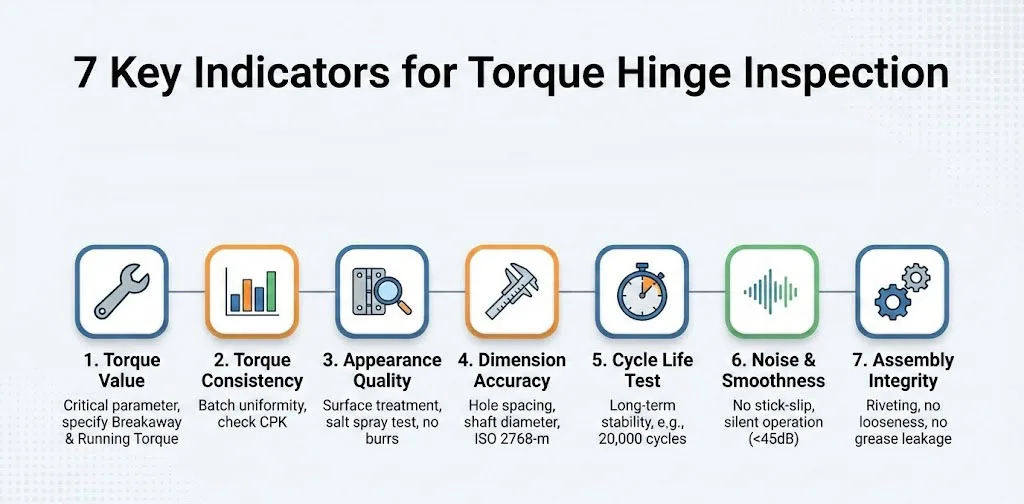
7 Key Indicators for Torque Hinge Inspection
Indicator 1: Torque Value
Torque value is the most critical parameter of a torque hinge.
If the torque value is inaccurate, a screen may not hold its position, or a lid may be too difficult to open.
In actual inspections, I have found that measuring just once is not enough.
Torque Testing Standards
We must execute tests based on standardized procedures.
I recommend referencing the principles of ASTM E2624 (Standard Practice for Torque Calibration).
- Test Equipment: You must use a calibrated digital torque tester, not an estimation by hand.
- Test Speed: I strongly recommend setting the test speed to 180 degrees per minute (180°/min). Excessive speed causes artificially high readings; too slow fails to reflect actual usage.
- Test Angle: Typically rotate from 0 degrees to 180 degrees, then return to 0 degrees.
Distinguishing Initial vs. Dynamic Torque
Many suppliers only provide “Peak Torque” data, which is misleading.
You need to focus on two specific data points:
Breakaway Torque: The force required to start the hinge moving from a standstill.
Running Torque: The continuous resistance during rotation.
Practical Advice:
In your inspection report, require the supplier to list these two values separately. If the Breakaway Torque is more than 30% higher than the Running Torque, the user will feel a distinct “stuck” or “heavy” sensation when operating the device.
Setting Acceptance Standards and Tolerances
In my experience, for industrial-grade products, a tolerance of $\pm 10\%$ is ideal.
If a supplier claims they can only achieve $\pm 20\%$, this usually indicates their manufacturing process is unstable.
Common Defect Case:
We once found a batch of hinges from a supplier for a medical device project that was 25% below the target torque. This caused the medical display to droop automatically in vibrating environments.
We immediately required a return and reset the acceptance standard: Any product deviating more than $\pm 15\%$ from the nominal value is judged as non-conforming.
Indicator 2: Torque Consistency
A single qualified hinge is not enough; we need consistency across the entire batch.
What is Batch Consistency?
Consistency refers to whether the torque value of the 1st product is close to that of the 1000th product in the same batch.
If a batch of hinges contains some that are tight and some that are loose, this causes massive trouble for your assembly line. Workers will spend excessive time pairing or adjusting, which increases labor costs.
Batch Sampling and Data Evaluation
I suggest using CPK (Process Capability Index) to evaluate consistency, rather than just looking at the average value.
When sampling, do not just take products from the top of the box.
Operational Advice:
Randomly select samples from the bottom, middle, and top of every box.
If you sample 50 units and the difference between the maximum and minimum values exceeds 20%, it indicates a serious quality risk in that batch.
Root Causes of Inconsistency
Based on my observations, poor consistency usually stems from the following technical issues:
- Uneven thickness of friction materials.
- Lack of quantified control in grease application.
- insufficient machining precision of the shaft (e.g., large cylindricity errors).
Indicator 3: Appearance Quality
Appearance is not just about aesthetics; it directly relates to corrosion resistance and product lifespan.
Surface Treatment and Corrosion Protection
For metal hinges, the plating or coating must be checked.
I strongly recommend conducting Salt Spray Tests based on the ASTM B117 standard.
- Test Standard: For standard environmental use, pass at least 24 or 48 hours of Neutral Salt Spray (NSS). For outdoor equipment, requirements should be raised to 96 hours or more.
- Check Point: Observe the crevices of the hinge for rust spots. This is usually where the plating is thinnest.
Common Appearance Defects and Risks
During inspection, please focus on finding the following defects:
- Burrs: Can cut the assembly worker’s hands or detach during rotation, entering the device and causing short circuits.
- Blistering: Indicates poor adhesion of the plating layer, which will peel off quickly.
Appearance Inspection Methods
Do not rely solely on the naked eye.
I suggest inspectors be equipped with a 5x magnifier.
Perform the check in a well-lit environment (illuminance greater than 1000 Lux). Rotate the hinge and check the root of the rotating shaft for “exposed substrate” (areas uncovered by plating).
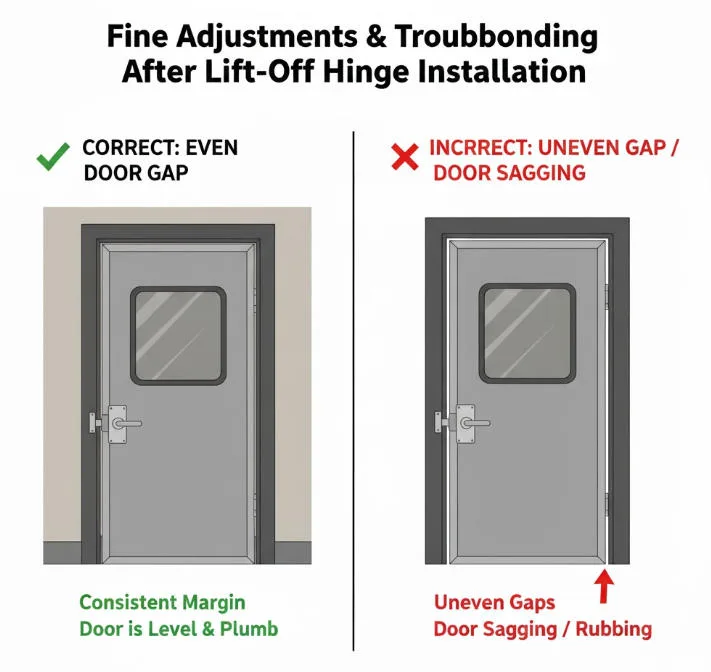
Indicator 4: Dimension Accuracy
Dimensional deviation is the number one reason for assembly failure.
Key Dimension Items
We do not need to measure every dimension on the drawing, but the following 3 key dimensions must meet requirements 100%:
- Hole Spacing: Directly determines if the hinge aligns with screw holes.
- Shaft Diameter: Affects overall strength.
- Installation Height: Determines the gap size after installation.
Measurement Standards and Tools
According to ISO 2768-m (General Tolerances), unless otherwise specified, tolerances should be controlled within the prescribed range.
Practical Advice:
Use high-precision digital calipers or specialized Go/No-Go Gauges.
I once encountered a case where a supplier’s hole spacing deviated by 0.5mm. Although it looked small, it caused the client’s automated assembly robots to fail at gripping the screws, forcing the entire production line to stop for corrections.
Therefore, creating simple “Go” and “No-Go” gauges is a highly efficient method during inspection.
Indicator 5: Cycle Life Test
This is the only way to verify long-term stability.
Setting Life Test Parameters
You need to clearly define “Life” in your purchasing contract.
Typically, we follow ANSI/BIFMA X5.5 (while a furniture standard, the testing logic is universal) or similar mechanical durability standards.
- Standard Setting: One cycle is defined as “opening to maximum angle and closing.”
- Pass Criteria: After completing 20,000 cycles (or specified count), torque decay must not exceed 20% of the initial value.
Sampling Strategy
Since life testing is destructive and time-consuming, we cannot perform full life tests on every batch.
My Recommendation:
- First Article Inspection: Full life testing must be completed during the trial production phase.
- Batch Sampling: Randomly select 3-5 samples per batch for a 24-hour rapid run test (e.g., run 2,000 cycles) to observe if there is a sharp trend in torque drop.
Actual Risks
If life testing is not performed, the most common issue is the product using inferior grease.
This grease thins out after friction generates heat. This results in the hinge completely losing its damping feel after 500 rotations, turning into a standard loose hinge.
Indicator 6: Noise & Smoothness
The difference between high-end and low-end products often lies in sound and feel.
Smoothness Check
We need to check for “Stick-slip” phenomena
This refers to the hinge feeling jerky or stuttering during rotation, rather than smooth. This is usually due to an excessive difference between the static and dynamic friction coefficients of the friction material.
Check Method:
Slowly rotate the hinge 360 degrees by hand. If there is obvious fluctuation or vibration transmission, it is non-conforming.
Noise Control
For medical devices or high-end electronics, noise is unacceptable.
Objective Testing:
Test in a silent room with background noise below 30dB. Use a decibel meter at a distance of 10cm while rotating the hinge.
Generally, the standard should be set as: No sharp friction sounds or metal impact sounds exceeding 45dB during rotation.
Indicator 7: Assembly Integrity & Parts Matching
This is the final line of defense, checking if the product is “assembled correctly.”
Riveting and Fastening
Most torque hinges are fixed via riveting.
I have found many defective products are due to insufficient riveting pressure.
Test Method:
Forcefully pull and twist the leaves at both ends (exceeding normal usage force). Check the shaft for looseness or wobble. If there is any Axial Play, this batch should be rejected.
Grease Leakage
Check for excessive grease overflowing at the assembly points.
Overflowing grease contaminates the appearance of the client’s product and attracts dust.
Inspection Focus:
Check if grease flows out after storing the hinge at high temperature (e.g., 60°C) for 2 hours. This simulates the environment inside a shipping container.
Inspection Process (SOP) Suggestions
To ensure the above indicators are effectively executed, we need to establish a Standard Operating Procedure (SOP).
Document Preparation
Before the inspector departs, the following documents must be ready:
Confirmed Technical Drawings: Marking key dimensions and tolerances.
Approved Sample (Golden Sample): For comparison of appearance and feel.
Defect Classification List: Clearly defining what constitutes “Critical,” “Major,” and “Minor” defects.
Sampling Plan
I strongly recommend using ISO 2859-1 or ANSI/ASQ Z1.4 standards for sampling.
Typically adopt:
- Inspection Level: Level II
- Acceptance Quality Limit (AQL):
- Critical Defect (Function Failure): 0
- Major Defect (Dimension, Torque out of spec): 2.5
- Minor Defect (Slight appearance issue): 4.0
Standard Inspection Workflow (Example)
Here are the efficient inspection steps I design for clients:
- Quantity and Packaging Check:Verify box labels, quantity, and shockproof packaging methods. Ensure no collision occurs during transport.
- Appearance Initial Check:Randomly select samples according to AQL standards. Check appearance under standard light sources.
- Dimension Detection:Use calipers and gauges to measure key dimensions. Record 30 data points to analyze distribution.
- Torque Test (Core Step):Fix the sample on the torque tester.Record initial Breakaway Torque and Running Torque.If the failure rate exceeds the AQL limit, stop inspection immediately and reject the batch.
- Feel and Noise Review:Manually review the feel of every sampled unit to rule out products with abnormal sounds.
- Destructive/Functional Testing (For small samples):Randomly take 2 samples for destructive testing (such as overload testing or destructive disassembly).
Supplier Selection Suggestions (Purchasing Decision Aid)
Problems discovered during inspection often stem from the choice of supplier.
Based on the 7 indicators above, when evaluating new suppliers, I suggest you focus on the following points:
Production Equipment and Process Capability
Do not just look at how many machines they have.
Ask them: “How do you ensure torque consistency during mass production?”
Excellent suppliers will show you their automated assembly lines and 100% In-line Inspection equipment. If they rely mainly on manual assembly and manual feel testing, torque consistency will be very difficult to guarantee.
Laboratory Capabilities
When visiting the factory, walk directly into their laboratory.
Check if they have:
- Digital Torque Testers (with current calibration labels).
- Salt Spray Testers.
- Life Cycle Testers.
If the lab is covered in dust or equipment is broken, it means they simply do not perform daily testing.
Data Recording Capability
Ask the supplier to provide a CPK analysis report for a previous batch.
If they cannot provide it, or do not know what CPK is, this indicates their quality management system is still at a very elementary stage.
Conclusion
Controlling the quality of torque hinges is not just about passing inspection; it is about protecting your brand reputation.
By strictly checking the 7 key indicators—Torque Value, Consistency, Appearance, Dimension, Life Cycle, Noise, and Assembly Integrity—you can filter out more than 95% of potential quality risks.
Establishing such a standardized inspection system requires an initial investment of time, but it will significantly reduce return rates and communication costs later on.
I suggest you immediately update these indicators into the technical annex of your procurement contracts.
FAQ
Q1: If the torque value slightly exceeds the tolerance (e.g., by 5%), should I accept this batch?
A: This depends on your application scenario. If it is for high-precision medical or optical equipment, I do not recommend accepting it, as torque decays over time and initial deviation can lead to later failure. If it is for a common industrial door or lid, you can accept it under a “Concession” based on actual feel, but you must require the supplier to rectify it in the next batch.
Q2: Why did the torque of my hinges increase after being stored in the warehouse for two months?
A: This is usually caused by the “Cold Welding” effect or the hardening of the grease. We call this “Static Torque Increase.” This is hard to detect during inspection. The solution is to require the supplier to use high-quality synthetic damping grease and perform high/low-temperature aging tests.
Q3: Must the Salt Spray Test be done every time?
A: Salt Spray Testing takes a long time (24-48 hours) and is usually not done on-site during shipment inspection. I suggest requiring the supplier to provide a raw material plating test report for each batch, or you sample once per quarter and send it to a third-party lab for full testing.
Q4: If sampling finds 1 critical torque failure, should the whole batch be returned?
A: According to the ISO 2859 standard, for “Critical Defects” (rendering the product unusable), the AQL is typically 0. This means finding 1 unit results in the rejection of the entire batch. Since torque failure is often a systemic issue, finding 1 implies there are many more unsampled defective units. I strongly recommend returning the entire batch for re-inspection.