Industrial Hinge Installation: When Do You Need Hinge Jigs?
IP ratings are more than just cosmetic issues; they are production bottlenecks that kill profitability. For engineers and managers, the challenge isn’t just installing a hinge—it’s achieving repeatability at scale without relying on the variable skill of operators. This guide moves beyond the basics of manual layout, using engineering data and failure analysis to demonstrate why transitioning to Hinge Jigs is critical for eliminating human error and ensuring process reliability.
Core Terminology Definitions
To ensure clarity, we must define key terms within an industrial context, distinguishing them from consumer woodworking scenarios.
Industrial Hinge Jig
A precision positioning tool designed specifically for metal, composite, or engineering plastic panels. Typically machined from hardened steel or aluminum alloy, these jigs contain hardened drill bushings to guide the drill bit and strictly control the perpendicularity of the hole.
Drilling Template
A simple planar tool, often a laser-cut thin steel sheet, used to mark hole center positions. Unlike a jig, a template does not necessarily provide physical guidance for the drill bit body.
Coaxiality
In multi-hinge systems, the axes of all hinges must align along a single theoretical straight line. Deviation leads to “Axis Binding.”
Poka-yoke(Error Proofing)
A design philosophy incorporated into jigs where physical constraints make it impossible for an operator to install the hinge in the wrong orientation or location.
Industry Benchmarks: Manual vs. Jig-Assisted
The following data compares efficiency and precision based on general manufacturing data for industrial enclosures (based on a mid-sized sheet metal workshop producing 50-100 units/day).
| Metric | Manual Marking | Jig/Fixture Assisted | Differential |
| Avg. Install Time (Per Hinge) | 3.5 – 5.0 Minutes | 0.5 – 1.0 Minutes | 400%+ Efficiency Gain |
| Position Repeatability | +/- 0.5 mm | +/- 0.1 mm | 5x Precision Gain |
| Scrap Rate | 1.5% – 3.0% | < 0.1% | Significant Reduction |
| Skill Requirement | High (Skilled Trades) | Low (General Operator) | Lower Barrier to Entry |
Why Use Jigs? A Technical Deep Dive
Precision & Alignment
For Piano Hinges or heavy-duty doors with 3+ hinges, even microscopic deviations are critical. According to ISO 2768-m (General Tolerances), if a door panel is 1000mm high and the vertical deviation between mounting holes exceeds 0.5mm, the lateral shear force generated during closure increases significantly.
This stress results in:
- Accelerated wear of the hinge pin.
- “Squeaking” or binding during operation.
- Uneven compression of gaskets, leading to IP65/IP66 failure under IEC 60529 standards.
Production Efficiency & Consistency
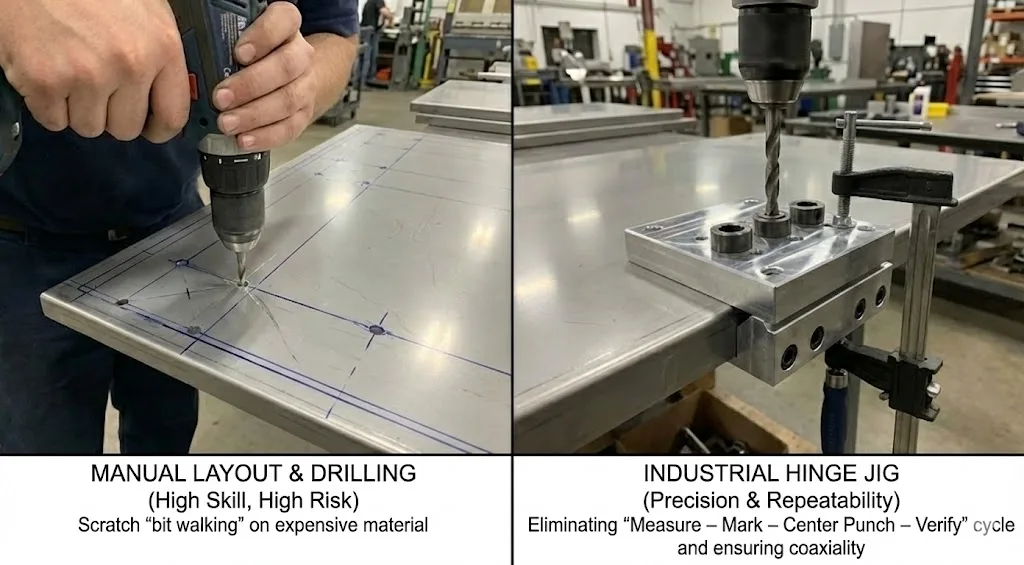
In mass production of electrical cabinets or HVAC units, time is cost. Jigs eliminate the “Measure – Mark – Center Punch – Verify” cycle.
- Without Jig: Measure X/Y coordinates -> Scribe -> Center Punch -> Pilot Hole -> Final Hole.
- With Jig: Clamp Jig to edge -> Drill.
Reducing Expensive Material Scrap

For food machinery or medical devices using 304 or 316 Stainless Steel, panel costs are high. Manual drilling often leads to “bit walking,” scratching mirror-polished surfaces, or misplaced holes that cannot be filled. The jig acts as both a physical shield and a guide.
Case Study & Worked Example: Torque Hinge Installation
Background: A medical device manufacturer uses Constant Torque Hinges on a display mount.
Problem: Customers reported severe torque degradation and difficulty rotating the screen after just three months.
Technical Analysis
Torque hinges rely on normal force between friction disks. If hinge axes are not parallel, rotation induces radial load.
Simplified Calculation Model:
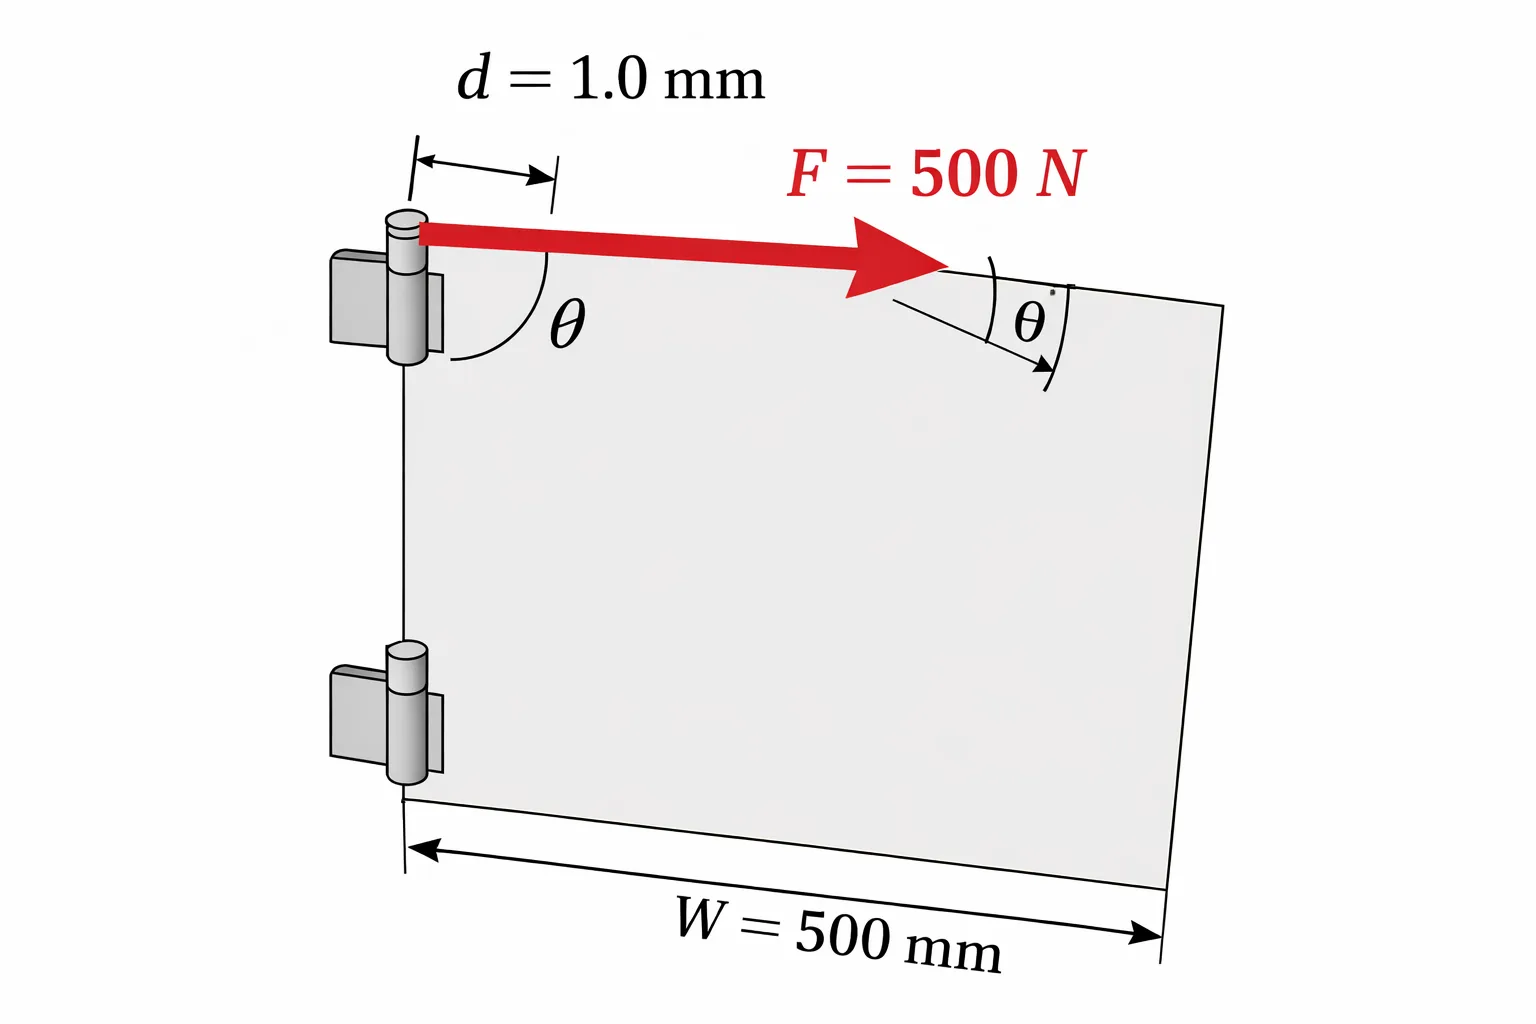
- Assume door width W = 500mm.
- Left hinge is perfect. Right hinge is offset in the Y-axis (perpendicular to axis) by d = 1.0mm.
- Misalignment angle theta during rotation:tan(theta) = d / W = 1.0 / 500 = 0.002
While the angle is small, for a precision friction hinge, this creates a bending moment on the pin.
- Assuming hinge stiffness k = 500 N/mm (estimated).
- Lateral force caused by misalignment:F = k * d = 500 * 1.0 = 500 N
Conclusion: Each rotation forces the hinge to bear an extra 500N of lateral force. This exceeds the hinge’s radial load rating, squeezing out internal grease and causing rapid friction disk wear.
Solution: Implementing a CNC-machined drilling jig controlled hole deviation to within 0.05mm, resolving the failure.
Decision Matrix: Do You Need a Jig?
Not every scenario requires the budget for custom jigs. Use this matrix to decide:
Scenario A: Must-Have (Critical)
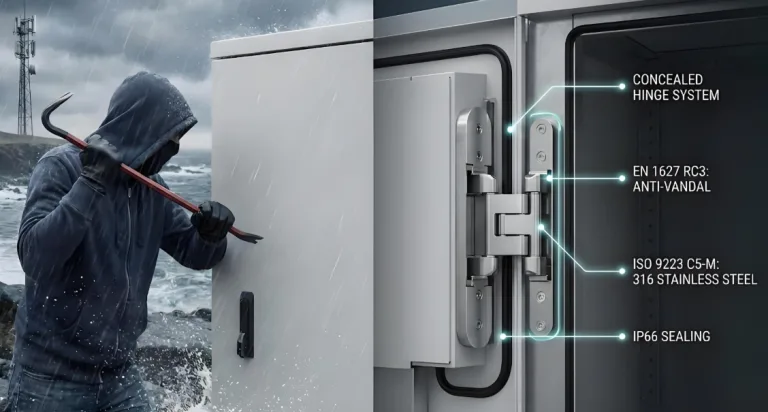
- Concealed Hinges: Require specific R-angle cutouts or counterbores that manual tools cannot stabilize.
- Torque/Damping Hinges: Extremely sensitive to coaxiality (as calculated above).
- High IP Ratings ( NEMA 4/4X, IP65+): Gaskets require uniform compression (usually 30-50%). A 1mm deviation causes leakage points.
- Heavy Panels (>50kg): Any tilt is amplified by the moment arm, causing door sagging.
Scenario B: Optional
- Slotted Hole Hinges: The hinge design includes adjustment allowance (usually +/- 2mm), allowing post-install tuning.
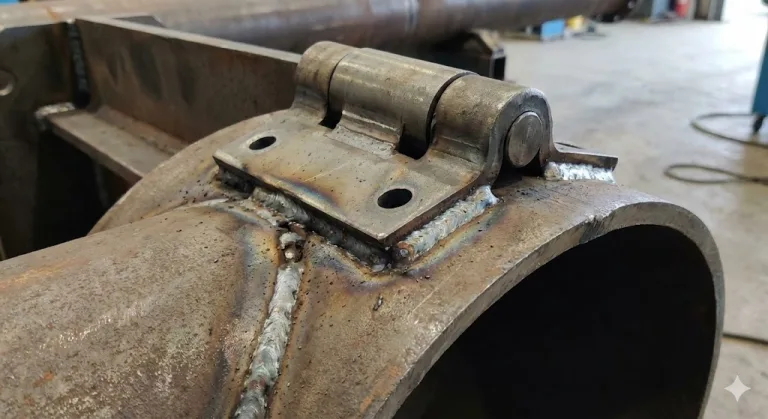
- Weld-on Hinges: Typically use magnetic blocks or simple spacers rather than drilling jigs.
- Prototyping/Repair: The cost of making the jig exceeds the part value.
Failure Mode and Effects Analysis (FMEA) – Hinge Installation
| Failure Mode | Potential Cause | Effect | Risk (RPN) |
| Eccentric Holes | Manual punch slip / Drill bit deflection | Screws won’t seat; forcing them strips threads. | High |
| Axis Misalignment | Marking error on hinge height | High resistance, hinge fracture, metal dust generation. | Severe |
| Surface Damage | Drill bit “walking” on surface | Passivation layer on SS damaged; rust formation. | Medium |
| Seal Failure | Improper depth/position | Water/Dust ingress; electronic component damage. | High |
Operational Checklist: Implementing High-Precision Installation
If you opt out of fully automated CNC punching, follow these best practices:
Jig/Template Preparation
- Ensure template material hardness exceeds workpiece hardness (e.g., use Carbide bushings for Stainless Steel).
- Verify the Datum Edge on the template for wear.
Pre-Drill Inspection
- Confirm panel thickness matches hinge screw length.
- For 304/316 Stainless, prepare Cobalt Drill Bits or Carbide bits.
The Installation Process
- Clamping: Use Toggle Clamps to secure the template. Never hand-hold a template while drilling.
- Lubrication: Cutting oil is mandatory to reduce heat buildup (heat causes expansion, affecting hole precision).
- Deburring: Clean the hole exit. Burrs will act as shims, preventing the hinge from sitting flush.
Validation
- Door should not spring back or bind in a free state (unless spring-loaded).
- Use feeler gauges to check for uniform gaps around the perimeter.
FAQ
Q1: For small batches (<50 units), steel jigs are too expensive. Alternatives?
A: Use 3D Printing (SLA/SLS) to create a resin template, then press in standard metal drill bushings. This hybrid approach is fast, cheap, and accurate enough for general industrial needs.
Q2: Modern laser cutting already makes holes. Do I need a jig?
A: If your sheet metal is fully CNC laser-cut, you generally don’t need a drilling jig (this is called “soft tooling”). However, for weld-on hinges, even with laser markings, a welding fixture is recommended to prevent thermal distortion from affecting alignment.
Q3: Why does my drill bit always walk on stainless steel?
A: Stainless steel is hard and smooth. Without a jig, you must use a center punch to create a divot. With a jig, ensure it sits tight against the surface and use short (“stub”) drill bits for maximum rigidity.
Q4: Do 3D Adjustable Hinges mean I don’t need precise drilling?
A: This is a dangerous misconception. 3D adjustment (Up/Down, L/R, In/Out) is designed to compensate for door fabrication tolerances and gasket aging, not to fix sloppy drilling. Excessive hole deviation will consume all your adjustment travel, leaving zero room for future maintenance.
Q5: Why did the torque value increase after installing my torque hinges?
A: The torque likely didn’t increase; the friction did. Remove one hinge and test the other. If they rotate smoothly individually but bind when paired, your axes are misaligned. You need a jig to correct the coaxiality.
Q6: Do I need a jig for aluminum extrusions?
A: Extrusions usually have standard T-slots. If you use hinges designed for T-nuts, the slot provides guidance. However, if you are drilling and tapping directly into the aluminum face, a jig is required to prevent bit deflection on the curved or smooth surface.