Mastering Lift-Off Hinge Installation: A Comprehensive Guide
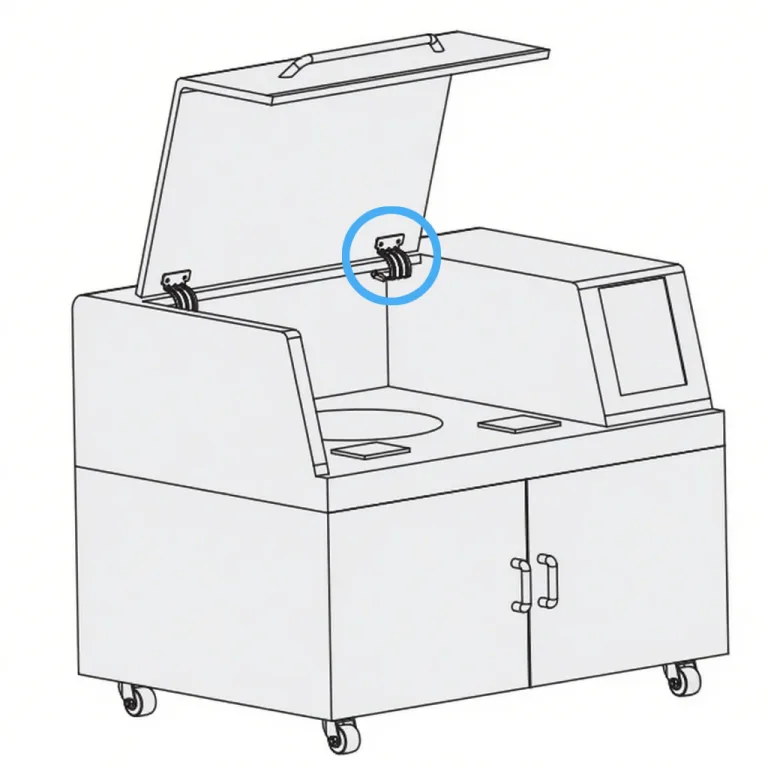
The lift-off hinge is a structurally flexible hinge assembly widely used in industrial applications such as control cabinets, server racks, and equipment access doors. It enables tool-free rapid removal of door panels, enhancing maintenance efficiency. For fundamental concepts and key advantages of Lift-Off hinges, refer to the [Introduction to Lift-Off Hinges — Overview and Benefits] section.
Proper hinge installation not only ensures smooth door operation but also directly impacts operational safety and equipment longevity. Additionally, proper lubrication and maintenance significantly extend hinge lifespan and prevent failure-related downtime.
This document provides a systematic, step-by-step guide covering hinge selection, installation, and maintenance to help engineering technicians master hinge installation essentials.
However, before commencing installation, a critical preparatory phase must be completed to lay the foundation for subsequent success.
Pre-Installation Preparation Essentials
Successful hinge installation begins with preparation. Selecting the appropriate hinge and precisely preparing the mounting surface are essential prerequisites for avoiding errors and ensuring professional quality.
Preparatory Steps
- Ensuring all tools and materials are available
- Cleaning the installation area to guarantee a flat, clean, debris-free surface
- Inspecting the structural condition of the door frame and door panel
Only after completing these preparations should marking and drilling operations proceed.
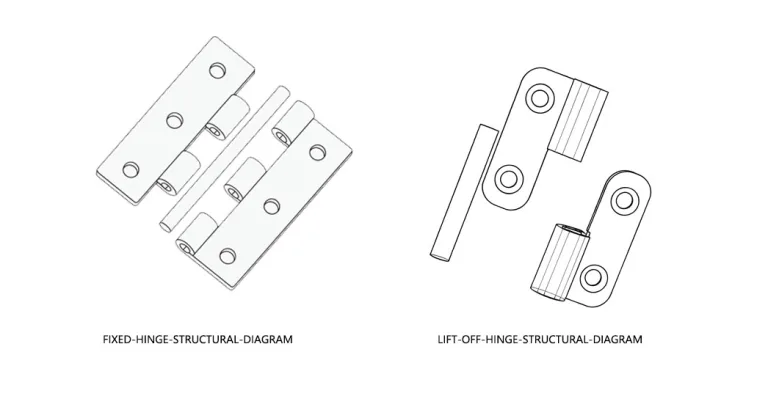
Understanding Lift-off hinges Hinge Structure and Direction (Left/Right Swing)
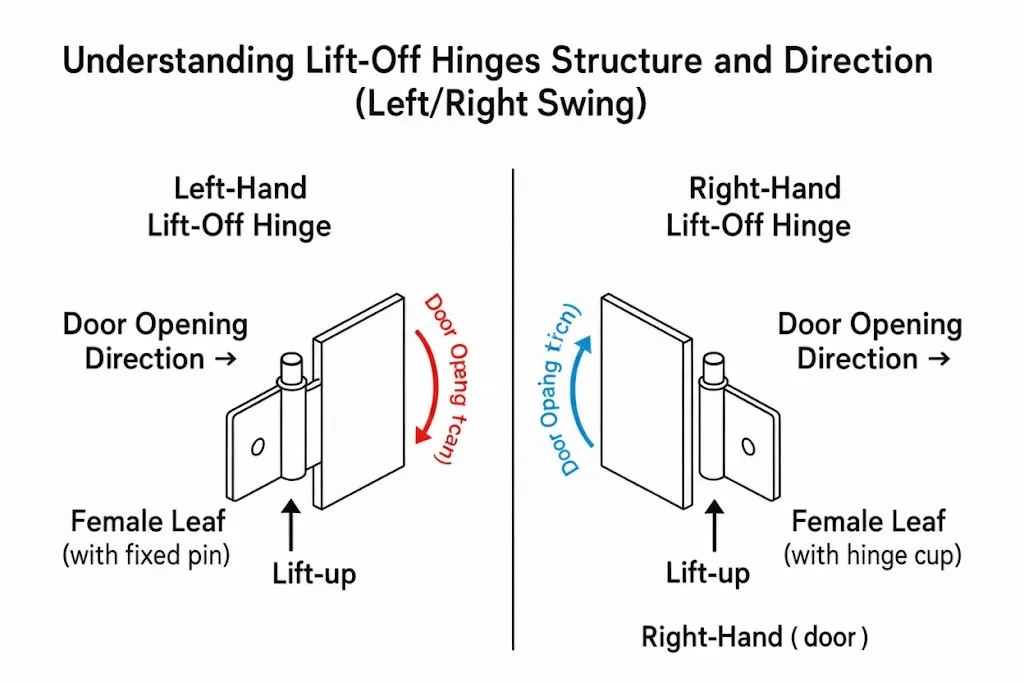
Lift-off hinges typically consist of a “male side” with a fixing pin and a “female side” with a hinge cup. Correctly identifying the hinge’s installation direction is a common challenge. For a detailed explanation of the structural design and working principle of Lift-Off hinges, refer to the [Introduction to Lift-Off Hinges — Definition and Working Principle] section.
Determining Hinge Orientation
- Stand on the side where the door opens outward
- If the hinge is on your right, use a right-opening hinge; otherwise, use a left-opening hinge
- Follow the “pivot-up” rule: When the door is closed, the hinge on the door leaf side should have its pivot facing upward
Use these guidelines to quickly determine which side of the hinge attaches to the door frame and which to the door leaf.
After determining the hinge orientation, selecting the appropriate material and load capacity is equally critical.
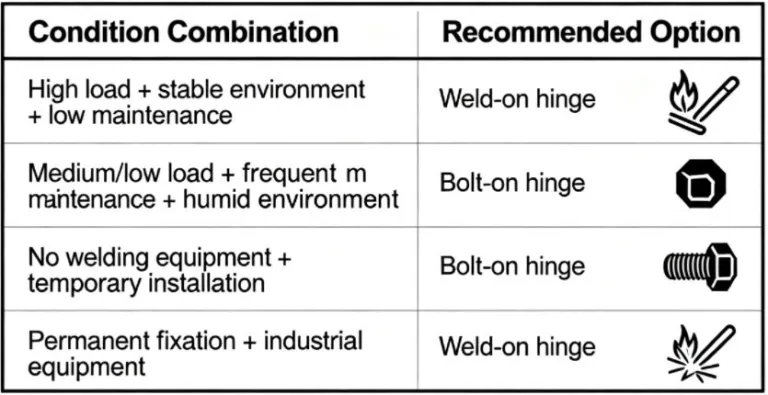
Material, Surface Finish, and Load Capacity: Key Factors for Durability
Hinge material and surface treatment directly impact corrosion resistance and strength. For an overview of common hinge materials such as stainless steel, aluminum, and carbon steel, and their corresponding applications, see the [Types of Lift-Off Hinges — By Material] section in the main article.
Material Specifications
| Material Type | Composition | Salt Spray Test Hours | Tensile Strength | Application |
|---|---|---|---|---|
| 304 Stainless Steel | 18% Cr, 8% Ni | 500-1000 hours | ≥520MPa | Strong corrosion resistance |
| 316 Stainless Steel | Enhanced with molybdenum | 1200 hours | – | Highly corrosive environments |
| Aluminum Alloy | – | – | – | Dry or low-load applications |
| Hot-dip Galvanized | – | – | – | Dry or low-load applications |
Load Capacity Guidelines
- Calculate door panel weight; ensure hinge rated load capacity ≥ door weight × 2 (safety factor)
- Allow approximately 25% safety margin in calculations to accommodate dynamic loads
- Load design typically follows a safety factor ≥2.0 principle
Selection Checklist
- Consider operating environment (humidity, salt spray, chemicals, etc.)
- Consult manufacturer load specifications and relevant standards (e.g., the DIN EN 1935:2002-05 single-axis hinge standard).
- Material selection examples: 304 stainless steel offers strong corrosion resistance, while 316 stainless steel suits highly corrosive environments
- Load design typically uses a safety factor of 2.0 or higher.
After determining the ideal hinge, the next step is to prepare installation tools and treat the mounting surfaces.
Precision Preparation of Installation Tools and Surfaces
Installing hinges requires precise tools and preparation to prevent misalignment caused by burrs or unevenness.
Common Tools Required
- Precision tape measure
- Level
- Center punch
- Appropriately sized drill bits
- Torque wrench
- Deburring tool
Preparation Steps
- Clean and degrease: Remove oil and debris to ensure a smooth metal surface
- Check flatness: Use a long straightedge to measure, controlling substrate flatness deviation within 0.3mm
- Deburr: Promptly remove burrs after drilling to prevent stress concentration
Ensure all tools are well-calibrated and strike the center punch steadily and accurately to avoid misalignment.
Once hinges are selected, tools are assembled, and surface preparation is complete, proceed to the core phase—installing hinge leaves.
Installation Process: Step-by-Step Guide for Precision Alignment
This section outlines the core installation procedures. Follow these logical steps to ensure precise alignment of each hinge leaf with the door frame and door panel.
Precise Marking and Positioning
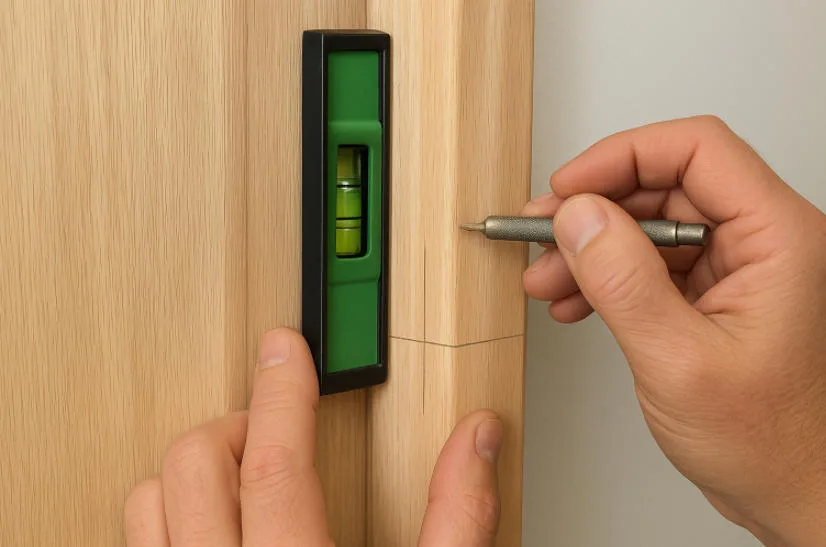
Precise Marking and Positioning for Lift-Off Hinge Installation
Accurate measurement and marking form the foundation of installation precision. Even a 1mm error can cause uneven door gaps or door jamming.
Marking Guidelines
- Use the top of the door frame as the unified reference line (horizontal baseline)
- Mark the hinge center positions on both sides of the door panel and frame
- Ensure marks are symmetrical and parallel, using a square or right-angle gauge for calibration
- Use a center punch to create indentations at marking points, preventing drill bit deviation during drilling
Important Notes
- Measure dimensions and mark lines using either the top of the door frame or the floor as the reference to avoid cumulative errors
- Maintain symmetry and parallelism when marking hinge centers to ensure consistent gaps on both sides
- Use a center punch to create small indentations at each mark for precise, offset-free drilling
- Verify mark line levelness with a spirit level to prevent door “drift” after installation
After completing all hole markings, proceed to drill pilot holes and tap threads.
Drilling Pilot Holes and Tapping Threads
Drilling correctly sized pilot holes prevents material splitting or thread stripping, ensuring fasteners provide adequate holding force.
Pilot Hole Specifications
| Screw Size | Drill Bit Diameter | Notes |
|---|---|---|
| M5 | 4.0-4.2mm | For metal screws |
| M6 | 5.0mm | For metal screws |
Drilling and Tapping Procedure
- Maintain a perpendicular angle between the drill bit and panel surface during drilling
- For metal door panels, first tap the positioning dimple with a hammer before drilling
- After drilling, cool with appropriate cutting fluid
- Select a tap matching the thread specification for tapping
- Apply even feed pressure and lubricate with cutting oil during tapping
- Remove burrs around the hole with a deburring tool
After drilling, holes should be clean and smooth with no burrs or deformation, ready for bolt tightening.
Securing Hinge Leaves
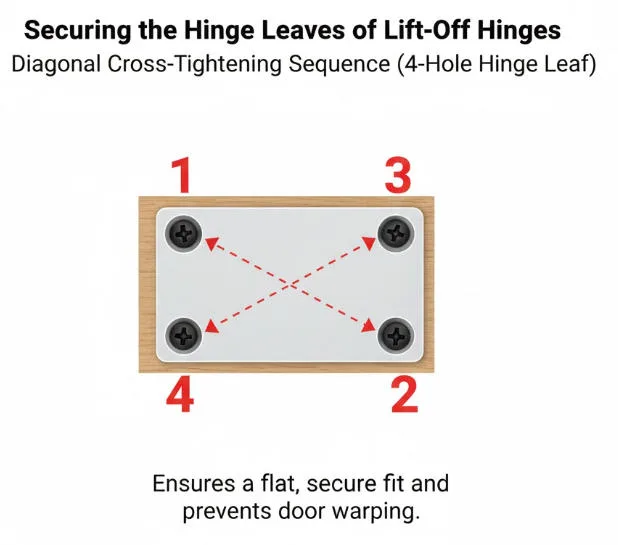
Securing the Hinge Leaves of Lift-Off Hinges
When attaching hinge leaves to door frames and panels, the sequence and tightening force of screws are critical.
Installation Sequence
- First install the hinge leaf on the cabinet (or door frame) side (typically the pin-mounted leaf)
- Lightly screw in the screws without fully tightening them
- Use a level to confirm the hinge is horizontal
- Tighten all screws progressively and evenly using a diagonal cross pattern
- Install the hinge leaf (sleeve-type) on the door body using the same method
Torque Specifications
- M6 screws should typically be tightened to 10–12 Nm using a torque wrench.
- For applications requiring anti-loosening, use spring washers, rubber washers, or threadlocker
- After completion, recheck the torque of each screw to ensure no loosening
Once both hinge leaves are securely fastened, proceed with door installation and preliminary alignment checks.
Adjustment and Verification: Key Steps for Achieving a Perfect Fit
A successful hinge installation is evaluated by smooth door operation and uniform gaps. This section details how to install the door panel and conduct preliminary checks, followed by fine-tuning the hinges to confirm all parameters meet requirements.
Door Installation and Initial Inspection
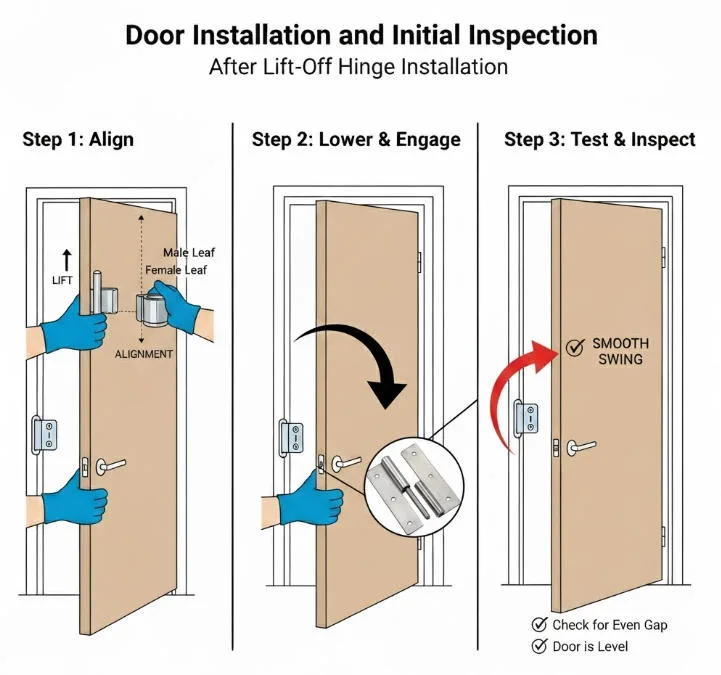
Door Installation and initial InspectionAfter Lift-Off Hinge Installation
Lift the door panel and align it, gently inserting the door hinge (pin side) into the frame hinge (sleeve side) until they engage.
Inspection Steps
- Lift the door panel to align the hinge bushings with the frame pins, maintaining the door’s horizontal level during positioning
- Lower the door panel and open it to 90° to verify stable hinge positioning without binding
- Open and close the door multiple times; the reveal gap should be uniform, and the door should engage the latch when closed
- If misalignment (too high/low) or uneven gaps occur, perform fine adjustments
Beyond static checks, conduct dynamic opening/closing tests to identify potential issues.
Fine Adjustments & Troubleshooting
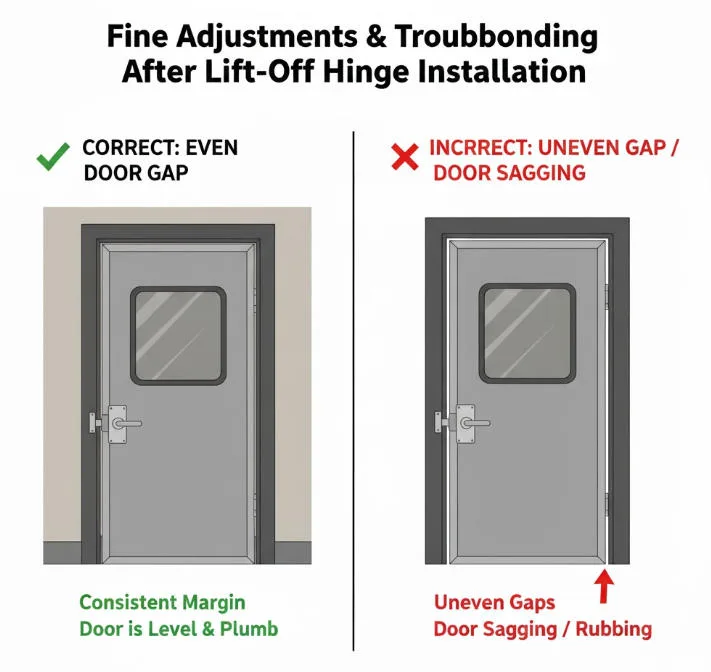
Fine Adjustments & TroubbondingAfter Lift-Off Hinge Installation
Minor deviations may occur even with precise initial alignment. Common issues can be quickly diagnosed using the following format:
Common Issues and Solutions
| Problem | Cause | Solution |
|---|---|---|
| Door sticks and is difficult to close | One hinge leaf is not flush with the surface or screws are loose | Inspect and compare hinge planes; add thin shims; re-tighten loose screws |
| Uneven door gap | Installation height deviation on one hinge side | Loosen corresponding hinge screws, adjust vertical position, retighten |
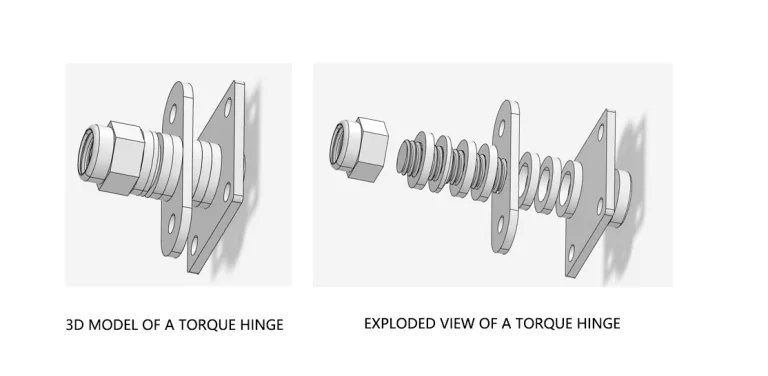
| Door opens/closes spontaneously | Door frame not perfectly vertical or door panel center of gravity shifted | Recalibrate door frame vertical alignment; use torque hinges |
| Hinge produces abnormal noise | Loose locating pins or hinge components | Inspect fit precision; tighten double nuts or replace mating parts |
After fine-tuning through the above steps and countermeasures, retest the door panel’s opening and closing until operation is smooth and gaps are uniform.
Final Inspection, Torque Verification, and Lubrication
After installation, perform a comprehensive final check and lubrication to secure alignment and protect hinge longevity.
Final Inspection Steps
- Re-inspection: Fully open and close the door multiple times to confirm smooth operation
- Torque Verification: Use a torque wrench to individually check all fasteners against manufacturer specifications
- Lubrication: Apply industrial-grade lubricant to hinge pins and moving parts
After completion, open and close the door again to ensure even lubrication penetration throughout all components, with smooth operation without resistance.
Final inspection ensures all installation parameters meet requirements. Proper lubrication and anti-loosening measures guarantee long-term stable hinge operation.
Long-Term Maintenance and Safety Essentials
Perfect installation is just the beginning. To maintain safety and stability over time, establish a comprehensive maintenance system and safety protocols.
Establish a Regular Inspection and Maintenance Schedule
Implement a scheduled inspection plan for hinges:
Inspection Frequency
- High-use or vibration-prone environments: Quarterly comprehensive inspections
- Standard equipment: Semi-annual or annual inspections
Sample Inspection Checklist
| Inspection Item | Procedure | Standard |
|---|---|---|
| Bolt Tightening | Verify torque with torque wrench | Meet specified values |
| Wear Inspection | Examine pins and hinge sleeves | No visible wear, increased clearance, or corrosion |
| Cleaning and Lubrication | Remove dust and debris; reapply grease | Smooth operation |
| Functionality Testing | Verify door operation and safety devices | Proper function |
Regular maintenance not only ensures long-term hinge performance but also enhances overall equipment reliability and lifespan.
Safety Standards and Compliance Requirements
Improper hinge installation or maintenance poses significant safety risks.
Key Safety Protocols
- Load Requirements: Never exceed manufacturer’s rated load capacity
- Installation Environment: Ensure no obstructions along hinge’s lifting path; maintain safe clearance
- Personal Protective Equipment: Wear safety glasses and gloves during installation and maintenance
- Grounding and Protection: Comply with IEC / NEMA / IP protection rating requirements; ensure proper grounding.
- Quality Standards: Refer to standards like DIN EN1935:2002; verify anti-loosening performance through vibration testing.
Strict adherence to installation and maintenance safety protocols maximizes the benefits of lift-off hinges while minimizing accident risks.
Conclusion: Achieving Excellence Through Systematic Practice
Precision and systematization are pivotal to successful installation. Every stage—from selection preparation to installation commissioning and maintenance inspection—demands meticulous execution.
Only by strictly adhering to manufacturer technical specifications and industry standards can installation quality, safety, and equipment longevity be ensured. Maintain a professional mindset, integrating standardization and a commitment to excellence into every operation.
On this foundation, you will achieve outstanding performance from hinge assemblies, ensuring the long-term safe and reliable operation of industrial equipment.