

Industrial Door Hinge Sag: Causes, Diagnosis & Fixes
An industrial door that has to be lifted before the latch will engage is showing more than an alignment inconvenience. The geometry of the door system has changed. With industrial door hinge sag, the useful question is not simply whether the hinge is “strong enough.” Something in the load path has moved, worn, flexed or become unable to hold its original position.
The visible symptom may be a dropped latch-side corner, a tapered reveal, rubbing against the frame, or a latch that was aligned at commissioning but no longer meets the keeper. Replacing the hinge immediately can hide the real cause. Tight bolts do not prove that the mounting structure is stable, and an apparently intact hinge does not prove that its pin or bushing still controls the door position.
Diagnostic boundary: this article deals with a physical change in door position or hinge geometry. If the door remains geometrically aligned but a positioning panel slowly rotates after the operator releases it, diagnose torque hinge positional drift instead.
Start With the Door Geometry
A sagging industrial door usually announces itself through geometry before the hinge itself shows obvious damage. Begin with fixed references on the frame. Do not judge the condition only by how the door feels when it swings.
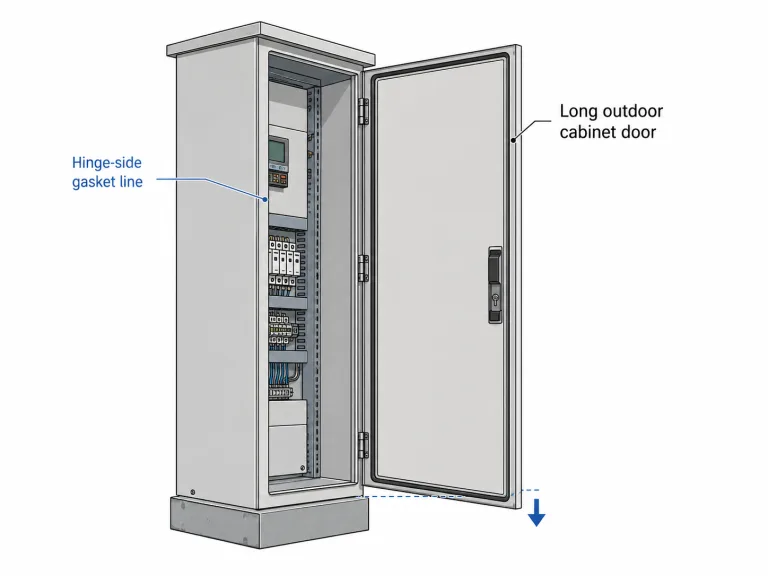
Close the door without forcing the latch. Compare the upper and lower clearances on both the hinge side and latch side. Look at the position of the latch relative to its keeper, and note whether the free corner of the door sits lower than its original position.
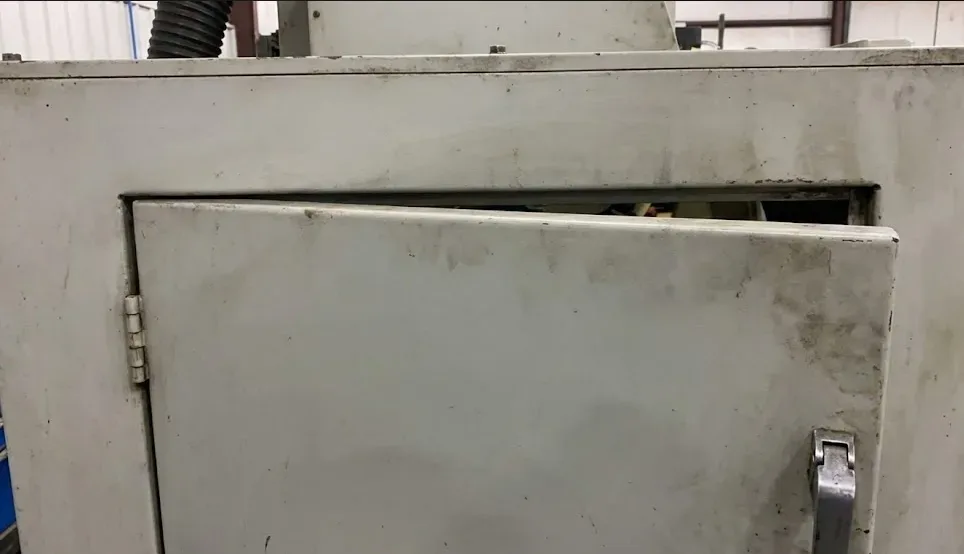
| Observed symptom | What it tells you first | Evidence to inspect next |
|---|---|---|
| Latch-side corner has dropped | The door is no longer maintaining its original support geometry | Hinge mounting points, pin clearance, frame stiffness and door distortion |
| Top and bottom reveal are no longer parallel | The door, frame or hinge line has shifted relative to the opening | Reference dimensions at closed position and several opening angles |
| Door must be lifted before latching | The latch is compensating for a structural position error | Vertical movement at the free edge and movement at individual hinge joints |
| Door rubs only at certain opening angles | Pure vertical sag may not be the only problem | Hinge-axis alignment, frame twist, leaf seating and local interference |
| Gap changes when the free edge is slightly unloaded using controlled support | Clearance or structural flexibility exists somewhere in the support path | Watch each hinge, fastener joint, bracket and frame section as the supported load changes |
The most useful measurement is often the change from a known reference rather than a universal allowable number. A control cabinet, machine guard and vehicle access door may have very different acceptable gaps. Use the released drawing, approved sample or project acceptance condition when one exists.
Sag or Torque Drift?
The word “sag” is sometimes used for two different motions. They need different tests.
A structurally sagging door changes its position relative to the frame. Reveal dimensions change. The latch may move downward. A hinge leaf, mounting bracket, pin centerline or frame section may also move. That is a structural sag problem, not a holding-torque problem.
Torque drift is different. A positioning hinge may hold a panel at one angle when new and later allow the panel to rotate after release. If the pivot geometry remains stable, the investigation belongs to holding torque, applied moment, friction behavior or another rotational load—not to structural door sag.
Simple separation test: if the latch position and door-to-frame geometry have physically moved, stay on the structural-sag path. If geometry remains stable and the panel only rotates around its intended pivot after release, move to the torque-drift diagnosis.
The Load Path Behind Latch-Side Drop
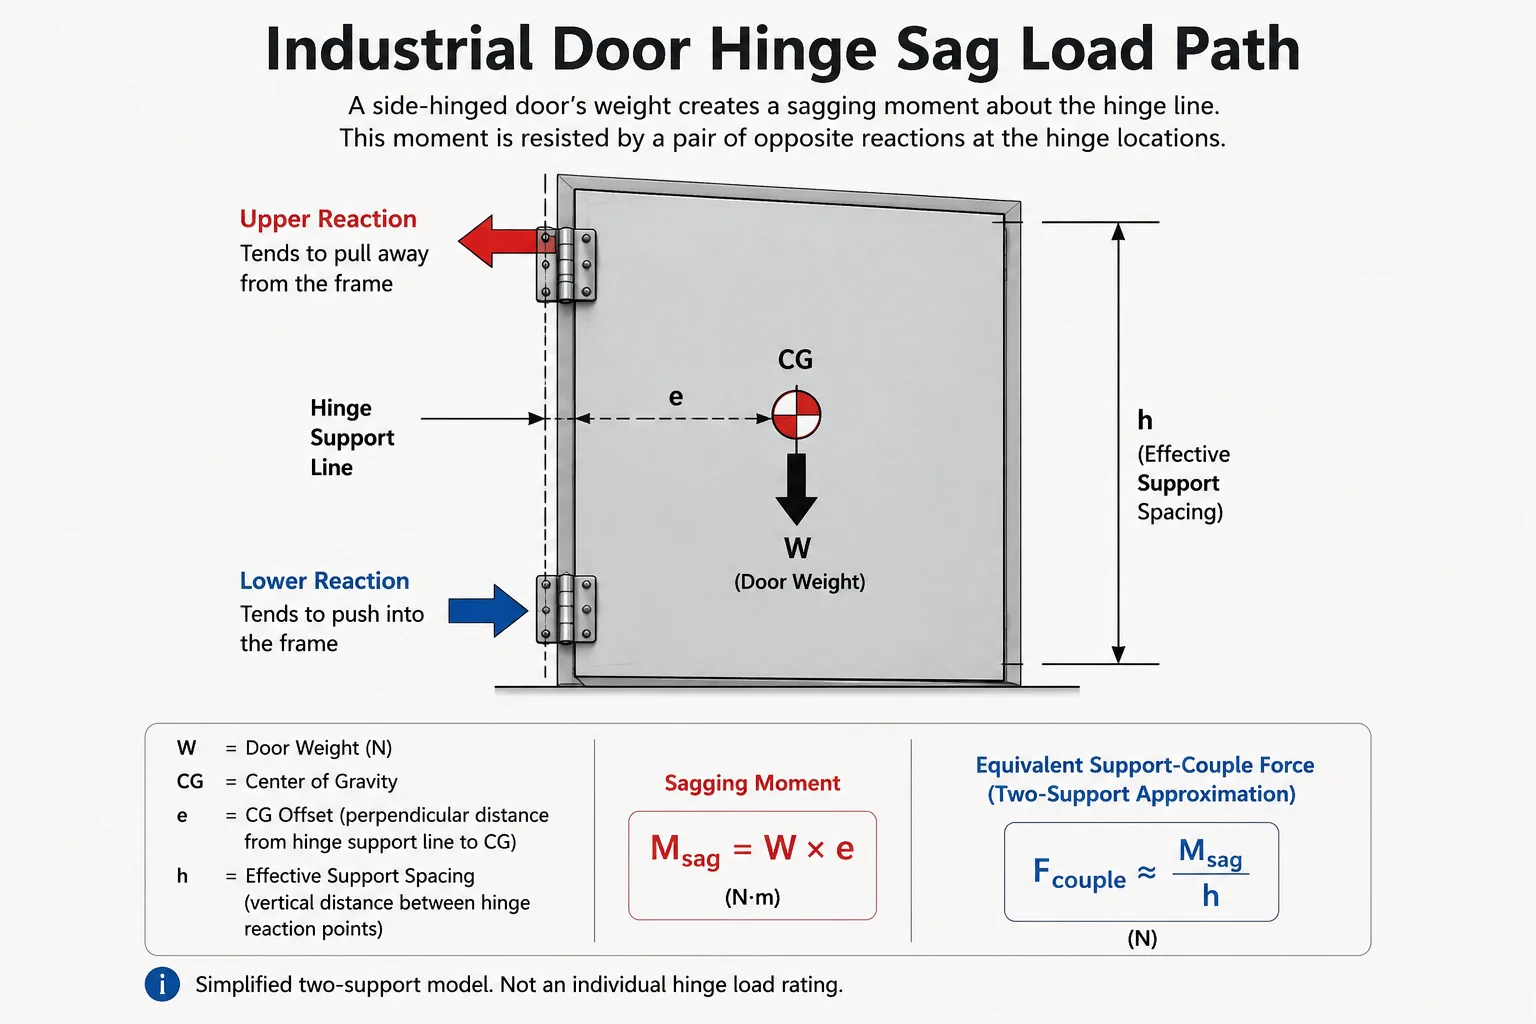
A side-hinged industrial door behaves as a cantilevered assembly. Its mass acts at a center of gravity some distance from the hinge support line. That offset creates a bending moment that must be reacted by the hinges, fasteners, brackets and surrounding frame.
Door weight:
W = m × g
Simplified sagging moment:
Msag = W × e
Equivalent support-couple force — two-support approximation:
Fcouple ≈ Msag / h
Where W is gravitational force, m is door mass, g is gravitational acceleration, e is the perpendicular distance from the hinge support line to the door assembly center of gravity, h is the effective vertical separation between reacting supports, and Fcouple is the approximate magnitude of the opposing force couple needed to resist the sagging moment.
These relationships are a simplified static model, not a hinge load rating. The hinges also carry the door’s vertical shear. The couple relationship describes only the additional opposing forces required to resist the sagging moment and should not be interpreted as the load on one individual hinge.
Actual load sharing depends on hinge stiffness, hinge quantity and location, mounting compliance, door stiffness, axis alignment, dynamic impact, stops, seals and other constraints. The approximation becomes especially limited in three- or four-hinge assemblies, where the load is rarely divided equally among all hinges.
The model is still useful because it exposes two important relationships. Moving the center of gravity farther from the hinge line increases the sagging moment even if the door mass does not change. Reducing the effective vertical separation between the primary reacting supports increases the force couple needed to resist the same moment.
This is why “the door weighs only ___ kg” is incomplete information. Door width, attached components and hinge spacing change the structural demand. A handle, display, insulation panel, cable assembly or other hardware near the free edge can also move the center of gravity outward.
This sagging moment should not be confused with the rotational torque used to hold a horizontal lid or positioning panel at an angle. They are different load cases.
Find Where the Geometry Moved
Once physical sag is confirmed, do not begin by choosing a replacement hinge. Find the interface where relative movement appears. The same dropped corner can result from very different faults.
| Possible root cause | Typical evidence | What separates it from the other branches |
|---|---|---|
| Mounting migration | Witness marks, shifted leaf, loose fastener, elongated hole, insert movement, cracked or displaced weld | Relative movement is visible between hinge leaf or bracket and mounting structure |
| Pin, knuckle or bushing wear | Radial or vertical play at the hinge joint while the mounting leaves remain fixed | Movement occurs inside the hinge rather than at its mounting interface |
| Hinge-axis error | Binding, uneven rotation, one hinge appearing heavily loaded, changing resistance through travel | Individual hinge axes do not behave as one common pivot line |
| Frame deformation | Mounting wall or bracket moves with applied door load | Hinge may remain tight to its bracket while the supporting structure flexes or yields |
| Door-panel deformation | Door is twisted or no longer flat even when hinge points are stable | The moving member itself has changed shape |
| Undersized system | Sag returns after repair, local stress remains high, or the current layout has little structural margin | No single loose component explains the recurring behavior |
Mounting Shift Before Hinge Failure
A hinge can be mechanically sound while its mounting point moves. This matters on sheet-metal enclosures, fabricated brackets and welded doors where local panel stiffness is part of the hinge system.
Inspect around every hinge leaf rather than only checking whether a bolt feels tight. Look for fretting marks, displaced paint lines, hole elongation, pulled inserts, local dimpling, cracked coating around a weld, or a visible gap between the leaf and its mounting surface.
A tightened fastener can clamp an already-deformed joint. The bolt being tight today does not prove that the interface has remained in its original position.
Pin, Knuckle, and Bushing Wear
If both hinge leaves remain fixed to the door and frame, watch the hinge joint while a small controlled change in load is applied to the supported door. Relative motion between the pin and knuckle or bushing points toward hinge clearance rather than mounting migration.
The useful question is not merely whether some clearance exists. It is whether the current clearance produces unacceptable movement at the latch side. A small change near the hinge can become much more visible at a wide door’s free edge.
There is no single pin-clearance limit that applies to every industrial door assembly. Compare the measured clearance with the hinge drawing, supplier data or the project-specific functional limit.
Frame and Door Deformation
The hinge may be blamed because that is where the motion is visible. Sometimes the real spring is the enclosure wall, hinge reinforcement, mounting flange or door panel.
Place a fixed visual reference on the frame and observe the hinge mounting region as the supported door load changes. If the complete hinge moves together with the frame section, replacing the hinge alone will not remove the structural compliance.
Permanent deformation and elastic flex lead to different decisions. A permanently bent flange requires geometry restoration or structural repair. A surface that repeatedly flexes under normal load may require reinforcement or a revised load path even if it returns to its original position after the door is supported.
Axis Error Can Look Like Sag
Multiple hinges on one door are supposed to behave as a common pivot system. If their pin centerlines do not establish a compatible axis, the door can bind, spring, wear unevenly or transfer load into the frame in ways that resemble a simple sag problem.
That creates an important diagnostic trap. Adding another hinge can increase nominal support capacity, but it does not automatically improve the assembly if the additional pivot is forced onto a different axis. More hardware can create another constraint instead of solving the original one.
For a door that binds through travel or shows evidence that several hinges are not sharing one pivot line, move from sag diagnosis to a dedicated hinge-axis alignment review. For jigging, coaxiality and installation-geometry details, use that dedicated alignment guide rather than extending the sag diagnosis into a second installation topic.
Engineering conflict: a door can have tight bolts, an apparently adequate hinge size and no broken knuckle, yet still drop at the latch side because the frame around the hinge mount is flexing. Replacing the hinge with a stronger part may leave the same moving foundation underneath it.
When the Hinge System Is Undersized
After mounting movement, hinge clearance, axis error and structural deformation have been evaluated, look at the original hinge-system architecture. Recurring sag can indicate that the assembly is being asked to carry a load case that the hinge layout or surrounding structure was not designed to sustain.
Review the complete door, not the bare sheet or hinge model in isolation:
- final door mass with handles, windows, insulation and mounted equipment;
- center-of-gravity distance from the hinge support line;
- door height and effective spacing between hinges;
- hinge quantity and actual load sharing;
- frame and door reinforcement around each mounting point;
- opening stops and loads introduced when the door reaches them;
- vibration, impact or service conditions that differ from the original design;
- any components added after the original hinge selection.
Do not use hinge quantity as a substitute for structural analysis. A third hinge can help distribute load when the geometry and support structure permit it. It can also introduce binding when the mounting locations cannot hold a common axis.
Do not estimate individual hinge load by simply dividing door weight by hinge count. Load sharing in a multi-hinge door depends on stiffness, alignment, spacing and mounting compliance.
If the diagnosis shows that the original hardware or mounting architecture lacks sufficient capacity, review the available heavy-duty hinge options only after the real door geometry and mounting conditions are known. The objective is not to choose the largest hinge. It is to create a load path that remains stable in the completed assembly.
Industrial Door Hinge Sag Diagnosis
Safety first: support a heavy door before loosening hinges, brackets or structural fasteners. Isolate equipment as required by the site procedure. Do not rely on the hinge or latch to support a door while its load-carrying connections are being inspected or removed.
- Record the symptom before adjustment. Photograph the closed door and the hinge side. Record latch alignment and representative reveal dimensions. If someone adjusts the hardware first, part of the evidence is lost.
- Establish fixed frame references. Choose reference points that are not on the moving hinge leaf. Measure the door relative to the frame rather than relying only on a level or visual impression.
- Observe the supported door under a small controlled change in load. Watch each hinge joint, leaf, bracket and frame section while the free edge is gently unloaded or reloaded. Identify where relative movement begins.
- Separate internal hinge play from mounting movement. If the leaves remain stationary but the pin area moves, inspect hinge wear. If the entire hinge shifts relative to the frame or door, investigate the mounting interface.
- Compare more than one door position. Record the closed position and useful intermediate opening angles. A fixed amount of play, a progressively changing bind and a flexible frame can produce different patterns.
- Review the complete load case. Confirm final door mass, approximate center of gravity, hinge spacing, attached equipment and any change since the assembly was first accepted.
- Choose the repair only after one branch has supporting evidence. Tightening, hinge replacement, frame reinforcement and axis correction solve different failures. Do not use one as a generic cure for all four.
A useful troubleshooting record does not need a large amount of paperwork. A few dimensions, clear photographs and one short video showing where movement occurs are often more informative than a description such as “hinge loose” or “door sagging.”
Match the Repair to the Cause
The correction should remove the movement that created the geometry error. Restoring the latch position without restoring the load path can produce a door that looks repaired but begins dropping again after service.
| Evidence | Corrective direction | Do not assume |
|---|---|---|
| Fastener or insert has migrated; mounting hole is damaged | Restore the approved joint and assess whether reinforcement or a revised mounting method is required | Higher tightening torque will restore damaged material |
| Welded hinge or bracket has shifted, cracked or locally deformed | Repair the mounting structure using the applicable fabrication procedure and restore hinge geometry | A new hinge will correct the distorted base structure |
| Pin, knuckle or replaceable bushing has excessive functional play | Service approved replaceable components or replace the hinge as appropriate to its design | Realignment will remove internal mechanical clearance |
| Multiple hinge axes are incompatible | Correct the mounting geometry and restore a compatible pivot line | Adding another hinge will automatically improve load sharing |
| Frame or door panel flexes excessively under normal load | Review local reinforcement, section stiffness and load transfer | A stronger hinge can stiffen an inadequate mounting wall by itself |
| Existing system remains overloaded after geometry is restored | Re-evaluate hinge size, architecture, quantity, spacing and structural support as one system | Door weight alone defines the correct replacement hinge |
Shims or adjustment features can be useful when they are part of the intended installation method and the structure itself is sound. They should not be used to hide growing pin clearance, elongated mounting holes or permanent frame deformation.
The same principle applies to a replacement hinge. Match the repair to the evidence. If no evidence points to hinge damage, replacing the hinge first may simply reset the door temporarily while the original structural fault remains.
Verify the Repair Under Real Door Load
A repair is not verified when the unloaded hinge moves smoothly on the bench. Reassemble the complete door with the components that affect its mass and geometry, then return to the same reference measurements used before repair.
- Compare the closed-door reveal with the project reference.
- Confirm latch engagement without lifting or forcing the free edge.
- Operate the door through its required travel and watch for binding or frame movement.
- Recheck the mounting points after several controlled functional cycles.
- Confirm that any gasket, seal, cable or stop still operates as intended.
- Record the repaired baseline so later inspections can identify real change instead of relying on memory.
If long-term durability must be demonstrated, do not turn this troubleshooting exercise into an undefined “open and close it many times” test. Load, travel, cycle definition, checkpoints and failure criteria belong in a controlled industrial hinge cycle-testing protocol.
For a sag repair, the acceptance question is narrower: has the industrial door hinge sag been removed because the actual root cause was corrected, and does the door maintain its required geometry under the real installed load?
Questions That Change the Diagnosis
What causes an industrial door to sag?
Industrial door sag can result from mounting-point movement, hinge pin or bushing wear, incompatible hinge axes, frame or door deformation, or a hinge system that is undersized for the actual door geometry and load. The visible dropped corner does not identify which component failed, so the movement should be traced before hardware is replaced.
Can an industrial door sag even when all hinge bolts are tight?
Yes. Tight bolts only show that the fasteners are currently clamping the joint. The mounting holes or inserts may already have moved, the frame may flex, or clearance may have developed inside the hinge. Observe the complete mounting area while the supported door load changes.
How can I tell hinge wear from frame deformation?
Watch the hinge joint and surrounding mounting structure while a safely supported door is lightly unloaded and reloaded. Movement inside the pin, knuckle or bushing points toward hinge clearance. If the complete hinge moves together with its mounting panel or bracket, the supporting structure is involved.
Does adding more hinges prevent a heavy door from sagging?
Not automatically. Additional hinges can improve load distribution when the door, frame and mounting geometry allow them to share load correctly. If the hinge axes are not compatible or the mounting structure is flexible, another hinge may add constraint without correcting the root cause.
Why does the latch-side corner of an industrial door drop?
Door mass acts at a center of gravity offset from the hinge support line, creating a sagging moment that must be reacted by the hinge and mounting structure. Clearance, movement or insufficient stiffness in that load path can become visible as a much larger displacement at the free latch-side corner.
Share Photos and Sag Measurements
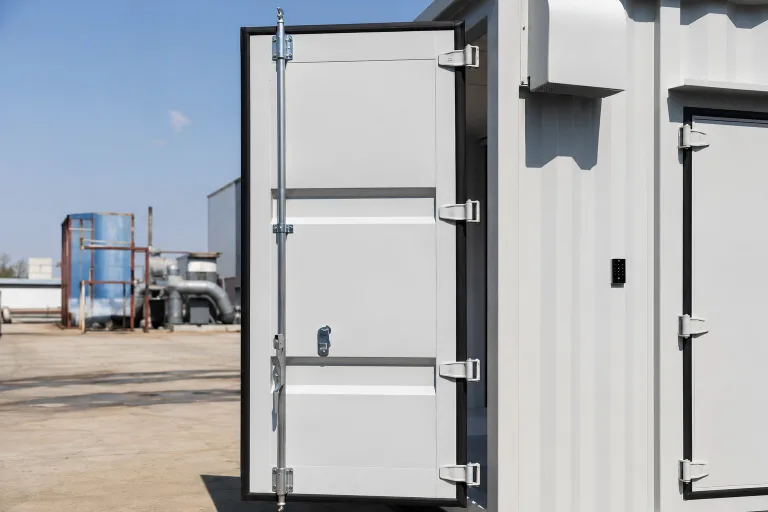
If an industrial cabinet, machine door or equipment access panel is dropping out of alignment, send the door dimensions, final assembly mass, hinge quantity and spacing, photos of each mounting point, a closed-door gap photo and any known change in latch position.
That information gives the discussion a clearer basis for separating hinge wear, mounting movement, frame deformation and a possible hinge-system capacity issue before a replacement model is considered.
Send Door Details
 English
  한국어
한국어  Русский
  Español
  Italiano
  Deutsch
  Français
  Português