

How to Install Torque Hinges: Alignment & Final Checks
Installation, Alignment & Functional Verification
A correctly sized torque hinge can still drift, bind, feel uneven, or develop unstable movement when the mounting surfaces move, the hinge axes are not coaxial, the fasteners distort the leaves, or the final adjustment is made without the real panel load. These symptoms are often blamed on hinge quality even though the problem was introduced during installation.
This torque hinge installation guide focuses on the work performed after the hinge has been selected: establishing the mounting reference, supporting the hinge leaves, aligning multiple pivots, tightening the fasteners without moving the axis, adjusting under load, and verifying the finished assembly. It is written for industrial lids, equipment covers, HMI displays, machine access panels, and similar position-holding applications.
Before Installation: Confirm the Released Hinge Configuration
Before drilling or tightening, confirm the approved hinge model, quantity, installed orientation, torque direction, opening range, fasteners, and whether the hinge is factory-set or adjustable. If panel weight, center of gravity, required torque, torque tolerance, or environmental suitability is still unresolved, complete the torque hinge selection guide before installation.
The procedure below assumes the released hinge configuration has already passed engineering review and that the installer is working from the approved drawing or mounting layout.
Prepare the Mounting Surfaces and Reference Features
A torque hinge transfers a continuous moment into the panel and frame. The leaves therefore need more than correctly located holes: they need stable, flat seating surfaces that remain in position after the fasteners are tightened and the panel load is applied.
| Mounting Feature | What to Verify | Installation Risk if Incorrect |
|---|---|---|
| Leaf seating area | Flat, clean, and free from burrs, weld spatter, heavy coating buildup, or raised hole edges | Leaf rocking, local distortion, changing axis position |
| Panel and frame stiffness | No visible flexing around the hinge footprint under the real panel load | Apparent torque loss, changing gaps, fastener movement |
| Hole position | Matches the approved drawing while still allowing the hinge axis to be established from a common datum | Holes appear aligned but pivot axes remain offset |
| Hole clearance | Sufficient for assembly but not treated as the axis-control method | Hinge moves during final tightening |
| Coating condition | Thickness and masking do not prevent full seating or change the designed stack | Soft joint, settling, loose fasteners, tilted leaf |
| Backing structure | Threads, inserts, nuts, or reinforcement can carry the approved clamp load | Thread pull-out, panel dimpling, loss of clamp |
Dry-fit each hinge before installing the panel. Confirm that both leaves contact their mounting surfaces without being pulled flat by the screws. A hinge that rocks during dry fit should not be forced into position through fastener torque; correct the surface, hole position, bracket, or backing structure first.
Establish One Common Hinge Axis
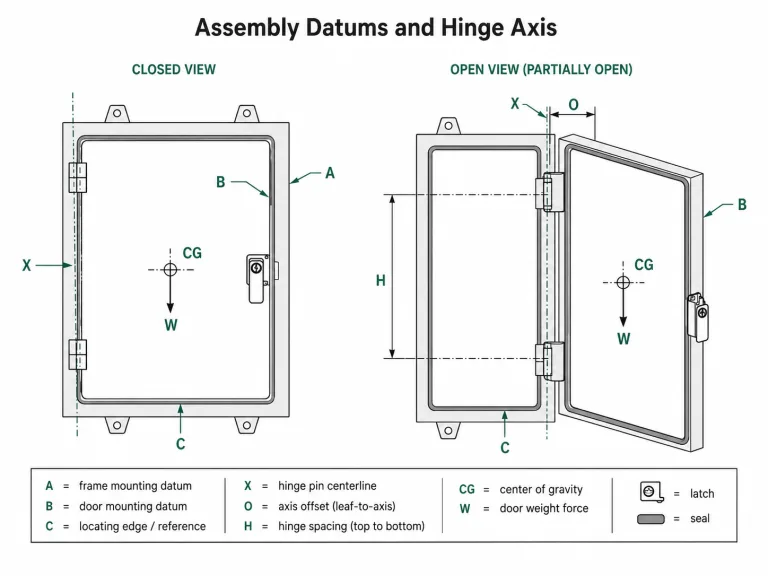
The pivot axes—not the mounting-hole centers—control how multiple torque hinges move together. Hole clearance can allow two hinges to bolt into place while their axes are offset, angled, or vertically stepped. When the panel rotates, one hinge then forces the other away from its natural path.

The mounting holes locate the leaves; a shared reference establishes the actual hinge axis.
Use a Datum That Represents the Pivot
Depending on the hinge and assembly, the reference may be an alignment shaft through compatible bores, a straightedge against machined pivot features, a laser line, a dedicated fixture, or a CAD-controlled bracket. The correct method is the one that locates the actual pivot centerline without damaging or preloading the hinge.
Do Not Force a Misaligned Pair to Rotate
If the panel becomes tight only after the second hinge is attached, stop and inspect the axes. Forcing the assembly through its range can create misleading “high torque,” scrape the pivot interfaces, distort mounting leaves, and accelerate localized wear. Loosen the fasteners, remove external panel load where practical, re-establish the common axis, and identify which bracket or surface is moving the hinge.
Where the supplier identifies hinges as a calibrated or matched pair, preserve the pairing and installed orientation. For the selection and performance implications of paired units, review why some torque hinges require matched pairs.
| Observed During Dry Movement | Likely Installation Cause | Immediate Check |
|---|---|---|
| Resistance rises at one angle | Axes are angled, offset, or the panel contacts the frame | Move the panel with fasteners loosened slightly and inspect gaps |
| One leaf shifts while moving | Insufficient clamp or unstable substrate | Mark leaf position and inspect the backing structure |
| One side feels heavier | Axis error, panel twist, or unequal adjustment | Check the common datum and hinge orientation |
| Panel springs sideways | Brackets or leaves are forcing different rotational planes | Check bracket parallelism and panel flatness |
| Movement is smooth before final tightening but tight afterward | Tightening sequence changes the leaf or axis position | Inspect seating, washers, hole clearance, and tightening order |
Control the Fastener and Hinge-Leaf Stack
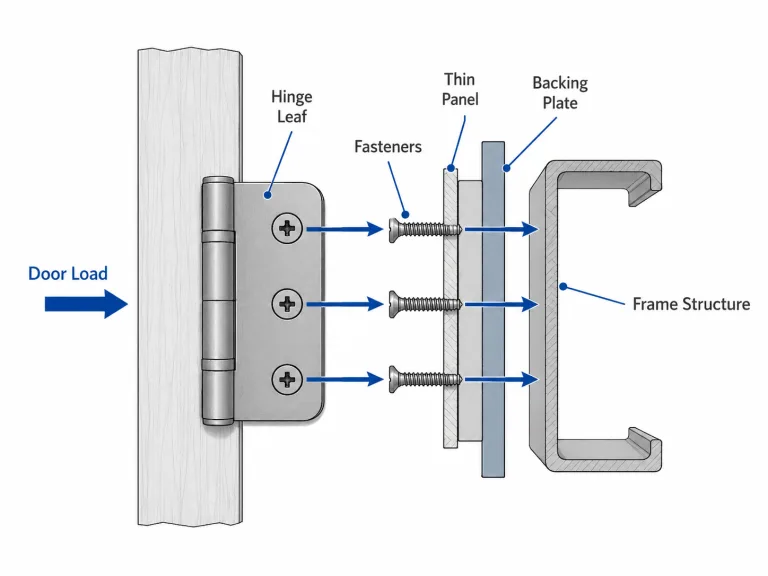
Fasteners must hold the hinge position without deforming the leaf, crushing the mounting surface, pulling out the supporting thread, or changing the pivot alignment. “Tighter” is not automatically more secure.
| Fastener Input | Installation Requirement | Failure if Uncontrolled |
|---|---|---|
| Fastener size and head style | Use the approved screw or bolt that seats correctly in the hinge hole | Point loading, interference, incomplete seating |
| Fastener length | Provide full approved engagement without bottoming in a blind hole | False tightening torque or damaged internal threads |
| Washer or bearing surface | Use only the approved stack and seating diameter | Leaf indentation, changed friction, reduced clamp stability |
| Thread condition | Clean, undamaged, and compatible with the approved fastener | Cross-threading, stripping, inconsistent clamp |
| Locking method | Use the approved mechanical lock or threadlocker when required | Fastener movement or changed torque-tension behavior |
| Tightening requirement | Follow the project drawing, hinge instructions, or validated work instruction | Under-clamp movement or over-tightening damage |
| Tightening sequence | Bring fasteners down in stages while maintaining the common axis | Leaf walks across clearance holes or becomes twisted |
Installation warning: Do not increase screw torque to correct a weak panel, an uneven seating surface, or a hinge that is not aligned. Excessive tightening can distort the leaf, damage a die-cast boss, pull threads from the substrate, or lock a previously smooth assembly.
The 7-Step Torque Hinge Installation Sequence
The following sequence keeps the hinge axis under control while the leaves, panel, and fasteners are brought into their final positions. Adapt the fixture and access method to the approved hinge drawing.
- Verify the released configuration. Confirm hinge model, quantity, orientation, handedness or torque direction, panel opening range, approved fasteners, and whether the hinge is adjustable. Preserve any supplier-defined matched-pair identification.
- Prepare and inspect the mounting surfaces. Remove burrs, debris, raised coating, and temporary obstructions. Confirm that each leaf sits flat without being pulled into place by the screws.
- Establish the common pivot axis. Use the approved datum, alignment shaft, fixture, straightedge, or laser reference. Do not use loose mounting holes as the only alignment control.
- Install the frame-side leaves provisionally. Bring the fasteners into contact without applying final tightening. Confirm that the leaves remain seated and can still be positioned from the common axis.
- Support and attach the real panel. Use a fixture or temporary support so the panel weight does not pull the hinges out of alignment during assembly. Attach the panel-side leaves and check gaps before final tightening.
- Tighten in stages while checking movement. Alternate between hinges and fasteners as appropriate. After each stage, move the panel through the operating range and confirm that resistance remains smooth and that the leaves do not shift.
- Adjust and verify under the real load. For adjustable hinges, tune in small increments with the actual panel, installed accessories, cables, and operational center of gravity. Complete the hold-angle, drift, gap, interference, and fastener checks before releasing the assembly.
Do not use the torque hinge as a lever to pull an unsupported panel into its final position. Support the panel until the leaves are seated and the fasteners have reached their approved condition.
Set Adjustable Models After Final Mounting
Adjustable models should be set only after the complete operating panel, attached hardware, cables, seals, and accessories are installed. Support the panel, change the setting in small increments within the supplier-defined range, and move the panel through its full operating range after each change. Where two adjustable hinges are intended to share movement, maintain the approved paired adjustment method rather than fully changing one side alone.
For adjustment mechanisms, model selection, and the difference between adjustable and factory-set designs, see the adjustable torque hinge guide.
Do not add unapproved lubricant during installation: Oil, grease, silicone spray, penetrating lubricant, or cleaner residue can change the controlled friction condition. Only apply a lubricant when the specific hinge drawing or supplier instruction identifies the approved product, quantity, and location. Diagnose alignment or interference before treating a tight hinge as a lubrication problem.
Complete the Final Functional Check
A successful installation is not defined only by whether the panel stays open once. The completed assembly must retain its axis, move smoothly through the required range, provide acceptable user effort, hold at the project-defined positions, and remain stable through the project-defined short installation check.
| Verification | How to Check | Failure Indication |
|---|---|---|
| Leaf seating | Inspect all leaf edges and witness marks after final tightening | Gap, rocking, shifted outline, or bowed leaf |
| Common-axis movement | Move slowly through the complete range while observing panel gaps | Tight spot, lateral panel movement, changing gap |
| Hold performance | Place the panel at each project-required angle with the real load | Immediate drift, drop, or return movement outside the requirement |
| Dwell stability | Observe for the project-specific dwell period | Progressive movement that was not visible in a quick check |
| User operating force | Evaluate through the complete range with the approved measurement or user criterion | Excessive effort, sharp force change, side-to-side inconsistency |
| Fastener stability | Check witness marks, seating, and project-required torque or clamp evidence | Rotation, settling, loose washer, substrate indentation |
| Interference | Inspect cables, seals, latches, stops, and adjacent panels at all angles | Rubbing, cable tension, seal roll, latch shift |
| Repeated operation | Cycle the completed assembly for the project-defined installation check | Growing drift, noise, play, or changing resistance |
This final functional check is not a formal cycle-life or durability test. It confirms only that the approved hinge was integrated correctly into this assembly. Longer-term torque decay and durability requirements belong in the product validation plan.
Symptoms Introduced During Installation
The timing of the symptom helps identify whether the installation process moved the axis, distorted a leaf, or changed the mounting stack.
| Symptom | When It Appears | Likely Installation Cause | Corrective Direction |
|---|---|---|---|
| Panel holds or moves smoothly before final tightening but not afterward | Only after fasteners reach final condition | Leaf distortion, axis movement, bracket shift, or changed panel geometry | Release the fasteners and inspect seating, surface flatness, and tightening sequence |
| Movement becomes tight at one part of the range | At a repeatable angle after mounting | Axis misalignment, panel contact, cable tension, latch interference, or seal interference | Separate hinge resistance from external interference and recheck the common axis |
| One side begins moving before the other | During initial panel movement after assembly | Unequal approved adjustment, panel twist, axis offset, or a moved leaf | Recheck paired orientation, common axis, leaf seating, and panel stiffness |
| Fasteners or hinge leaves move during the installation check | After short repeated operation | Insufficient clamp, unsuitable locking method, soft substrate, or seating settlement | Review the complete fastener, washer, thread, and backing stack |
Do not replace a hinge before confirming whether the leaf, bracket, fastener, or substrate moved during installation. If the assembly originally passed these checks but later loses holding force, use the guide to diagnose torque decay and long-term strength loss.
Composite Engineering Scenario: Smooth Before Tightening, Binding Afterward
This is a composite engineering scenario created to explain the installation logic. It is not a customer project record or product test claim.
A machine cover uses two factory-set torque hinges. The selected combined torque is appropriate, and the cover holds when the hinges are tested individually. During assembly, both leaves are positioned from the mounting holes and the screws are tightened fully. The cover then becomes difficult to move near the middle of its range, and one hinge leaf shows slight movement on the frame.
Inspection finds that the mounting holes have enough clearance for both hinges to bolt in place even though their pivot axes are not coaxial. One frame bracket also has a raised coating edge under the leaf. Final tightening pulls that leaf flat, shifting its pivot and forcing the two hinges to rotate in different planes.
- Remove the cover load and loosen both hinge sets.
- Correct the raised coating edge and verify full leaf seating.
- Use a fixture referenced to the pivot features rather than the hole centers.
- Support the cover while bringing all fasteners down in stages.
- Move the cover through its range after each tightening stage.
- Apply the final approved fastener condition and repeat the load, gap, and dwell checks.
The correction does not require a higher-torque hinge or lubricant. It removes mounting distortion and restores one common axis so the selected hinges can deliver their intended resistance.
Torque Hinge Installation Checklist
| Verify | Required Installation Evidence | Status if Missing |
|---|---|---|
| Released hinge configuration | Model, quantity, orientation, direction, and adjustment type match the drawing | Engineering Confirmation Required |
| Mounting-surface seating | Leaves sit flat without fastener force | Correct Surface Before Assembly |
| Common pivot axis | Established by an approved datum, fixture, shaft, or equivalent method | Alignment Required |
| Panel support during assembly | Panel load does not pull hinges out of position | Assembly Fixture Required |
| Fastener stack | Approved fastener, length, washer, thread, locking method, and seating | Work Instruction Required |
| Staged tightening | Axis and movement remain stable through the tightening sequence | Process Revision Required |
| Adjustable-hinge setup | Adjusted with the real panel and within the approved range | Project-Specific |
| Lubrication boundary | No unapproved lubricant or cleaner entered the friction interface | Cleaning or Replacement Review Required |
| Full-range movement | No tight spot, scrape, lateral movement, or sudden resistance change | Re-Alignment Required |
| Required-angle hold | Panel meets the project-defined position and drift requirement | Selection or Adjustment Review Required |
| Panel gap and interference | Gaps remain consistent; cables, seals, stops, and latches remain clear | Integration Correction Required |
| Fastener and leaf stability | No witness-mark movement, seating loss, or substrate deformation | Mounting Review Required |
The final acceptance limits remain project-specific. Preliminary installation guidance does not replace engineering review of the selected hinge, sample approval of the real assembly, or production approval of the controlled installation process.
Final Installation Rule
A torque hinge installation is correct only when the leaves remain flat, all pivots share the intended axis, the fasteners hold that geometry without damaging the mounting structure, and the finished panel passes its full-load movement and drift checks. Do not use extra screw torque, forced movement, or lubricant to compensate for an unresolved geometry problem.
For a project-specific installation review, send the hinge model, panel drawing, installed orientation, mounting detail, fastener specification, opening range, and photographs of the observed movement.
FAQs
Why does the panel bind only after the hinge fasteners are fully tightened?
Binding that appears only after final tightening usually indicates that a leaf moved, bowed, or was pulled against an uneven mounting surface. It can also mean the fastener sequence shifted one pivot away from the common hinge axis. Loosen the fasteners, check leaf seating and surface flatness, re-establish the pivot axis, and tighten again in controlled stages.
Can the mounting holes align while the torque hinge axes are still misaligned?
Yes. Clearance holes can allow both hinge leaves to bolt into place while the pivot centers are offset, angled, or stepped. Establish the actual pivot axis with the approved datum, fixture, alignment shaft, straightedge, or equivalent method rather than relying only on the hole centers.
Should I lubricate a torque hinge during installation?
Do not apply oil, grease, silicone spray, or penetrating lubricant to the friction interface unless the specific hinge supplier explicitly approves the product, quantity, and location. Lubrication can change the controlled friction condition and reduce holding torque. Diagnose alignment, interference, or contamination before treating a tight or noisy hinge as a lubrication problem.
Should two torque hinges be tightened fully one side at a time?
Normally the fasteners should be brought down in controlled stages while the common axis and panel gaps are checked, but the exact sequence depends on the hinge and fixture. Fully tightening one hinge before the second is located can pull the assembly away from the intended axis. Follow the approved installation drawing or work instruction.
How should an adjustable torque hinge be set after installation?
Set it with the complete operating panel installed, including normal attached hardware, cables, seals, or accessories that affect mass or center of gravity. Adjust in small increments within the supplier-defined range, move the panel through its full travel after each change, and verify user effort and hold performance at the project-required angles.


 English
  한국어
한국어  Русский
  Español
  Italiano
  Deutsch
  Français
  Português