

Hinge Mounting Hole Patterns: Confirm Before Ordering
An OEM buyer orders a batch of hinges that match the catalog photo perfectly — right size, right load, right finish. The parts arrive, the line starts, and none of them line up with the holes already in the door. The hinge is correct; the hole pattern is not. Now the whole batch is stuck waiting for re-drilled panels or re-made hinges, and a small detail nobody confirmed has become a schedule problem.
Hole pattern mismatches are one of the most common and most avoidable procurement errors with industrial hinges. This guide covers what an OEM buyer should confirm about a hinge’s mounting hole pattern before placing the order — the spacing, diameter, hole type, and tolerance that decide whether the part actually bolts up — and how to communicate it so the supplier builds the right thing the first time.
Summary: What to Confirm Before Ordering
Before ordering a hinge, confirm five things about its mounting hole pattern: the hole spacing (the distance between hole centers), the hole diameter, the hole type (round, slotted, countersunk, or threaded), the mounting pattern and orientation, and the tolerance on all of the above. For a replacement, measure the existing hole pattern rather than assuming it matches a catalog part.
The safest way to communicate all of this is a dimensioned drawing or a sample. A photo alone is rarely enough, because it does not carry the exact spacing and tolerance the supplier needs to match.
Why Hole Patterns Cause So Many Ordering Errors
A hinge’s hole pattern is easy to overlook because it is not the headline specification. Buyers focus on the load rating, the material, and the size — the things in the product title — and assume the holes will “just fit.” But the hole pattern is what physically connects the hinge to the door, and unlike the load rating, it has to match an existing pattern exactly, not just meet a minimum.
Two hinges can share the same leaf size, load rating, and finish and still have completely different hole spacing, hole diameters, or hole types. When that difference is discovered after the parts arrive, the options are all expensive: re-drill the doors, re-make the hinges, or add adapter plates. Confirming the pattern before the order avoids all three.
The Five Parameters to Confirm
A complete hole-pattern specification comes down to five parameters. Miss any one and the parts may not bolt up, even if the hinge itself is correct.
1. Hole Spacing
The center-to-center distance between holes, sometimes called pitch. This is the single most common mismatch and must match the existing pattern exactly.
2. Hole Diameter
The size of each hole, which sets the maximum fastener that will pass through. A hole that is a size too small forces a smaller fastener than the load needs.
3. Hole Type
Round, slotted, countersunk, or threaded. Each behaves differently at assembly, and the wrong type can change how the fastener seats and whether adjustment is possible.
4. Pattern & Orientation
The number of holes, their layout on the leaf, and the orientation relative to the pivot. A mirrored or rotated pattern will not line up even with the right spacing.
5. Tolerance
The allowable deviation on spacing and diameter. Tight patterns with many fasteners need tighter tolerance, or small errors stack up until the last hole will not align.
The rule
Confirm all five as a set. A pattern that is right on four and wrong on one still will not bolt up.
Round vs Slotted Holes: When Each Matters
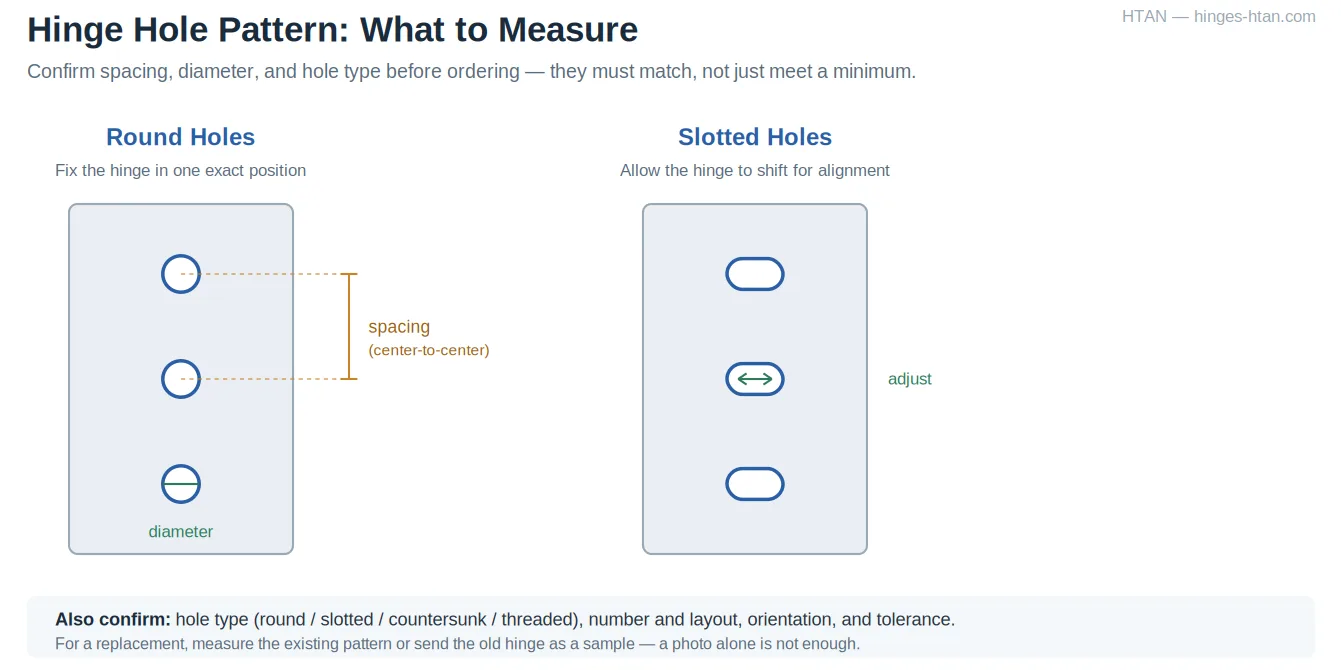
Hole type deserves special attention because it changes what the hinge can do at assembly. The most important distinction is round versus slotted, and choosing the right one can turn a fussy install into an easy one.
| Hole Type | What It Does | Best For |
|---|---|---|
| Round holes | Fix the hinge in one exact position | Precise, repeatable location where the pattern is known and fixed |
| Slotted / oval holes | Allow the hinge to shift for alignment during install | Adjusting reveal and alignment, or absorbing small pattern differences |
| Countersunk holes | Let the fastener head sit flush with the leaf | Flush surfaces, clearance, and appearance |
| Threaded holes | Accept a bolt directly without a nut behind | Blind mounting where the back of the panel is not accessible |
Slotted holes are worth calling out specifically, because they are the practical answer when a pattern is close but not exact, or when the door needs adjustment at install. Round holes give precise, repeatable location; slotted holes give a margin to align the door. Knowing which you need — and telling the supplier — avoids receiving a hinge that fixes the door in the wrong place.
Matching the Holes on a Replacement Hinge
Replacing an existing hinge is where hole-pattern errors happen most, because the new part has to match holes that are already in the door. Here the rule is simple: measure, do not assume. A hinge that looks identical in a catalog can have a different spacing or hole size that only shows up when it will not bolt on.
- Measure center-to-center between holes, not edge-to-edge, since edge distances vary with hole size.
- Measure the hole diameter directly, and note whether the holes are round, slotted, or countersunk.
- Record the full pattern — how many holes, their layout, and which way the leaf faces relative to the pivot.
- Photograph the old hinge next to a ruler as a backup, but send the measured dimensions as the primary reference.
- Send the old hinge as a sample where possible — it is the most reliable way to guarantee a match.
Once the holes match, the other half of a lasting replacement is making sure the surface behind them can carry the load, which our guide to hinge mounting plates and frame reinforcement covers in detail.
What to Send a Supplier to Get the Pattern Right
The difference between a hinge that bolts straight up and one that arrives wrong usually comes down to what the buyer sent at the quoting stage. A capable supplier can match a pattern precisely, but only from precise information.
Hole-Pattern RFQ Checklist
- Hole spacing (center-to-center)
- Hole diameter
- Hole type (round / slotted / countersunk / threaded)
- Number and layout of holes
- Orientation relative to the pivot
- Tolerance on spacing and diameter
- A dimensioned drawing or CAD file
- A sample or photo of the existing hinge
A dimensioned drawing is the clearest way to communicate a pattern; a physical sample is the most reliable. A photo helps but should not be the only reference, because it cannot carry exact spacing or tolerance. With a drawing or sample in hand, a supplier can confirm the match before cutting a single part. If you are specifying a hinge to an existing pattern, you can send your drawing or sample here for a match check before ordering.
Confirm the Pattern Before You Commit
Hole pattern is a small detail with an outsized ability to stall a build. It does not show up in the product title, it has to match exactly rather than meet a minimum, and it is discovered too late if nobody confirms it. Treating the pattern as part of the specification — spacing, diameter, type, layout, and tolerance, communicated by drawing or sample — turns a common ordering error into a non-issue. For a broader view of judging whether a supplier can hit that pattern reliably, our guide on how to evaluate an industrial hinge supplier covers the engineering and quality signals to look for.
FAQs
What is a hinge hole pattern?
A hinge hole pattern is the arrangement of the mounting holes on the hinge leaf — the spacing between them, their diameter, their type (round, slotted, countersunk, or threaded), the number and layout of holes, and their orientation relative to the pivot. It is what physically connects the hinge to the door, and unlike the load rating, it has to match an existing pattern exactly rather than just meet a minimum.
How do I measure the hole pattern on an existing hinge?
Measure the center-to-center distance between holes rather than edge-to-edge, since edge distances change with hole size. Measure the hole diameter directly and note whether the holes are round, slotted, or countersunk. Record how many holes there are, their layout, and which way the leaf faces relative to the pivot. Photograph the old hinge next to a ruler as a backup, but send the measured dimensions as the primary reference, and send the old hinge as a sample where possible.
What is the difference between round and slotted mounting holes?
Round holes fix the hinge in one exact position, which is best when the pattern is known and repeatable. Slotted or oval holes let the hinge shift slightly during installation, which helps adjust the door’s reveal and alignment or absorb small differences between patterns. If a pattern is close but not exact, or the door needs adjustment at install, slotted holes are often the practical answer; if precise, repeatable location is needed, round holes are better.
Why do two hinges with the same size have different hole patterns?
Because hole pattern is a separate specification from leaf size, load rating, and finish. Two hinges can share all of those and still differ in hole spacing, hole diameter, or hole type, since different manufacturers and models lay out their holes differently. This is why the pattern must be confirmed on its own before ordering rather than assumed from the overall size.
What should I send a supplier to match a hole pattern?
Send the hole spacing measured center-to-center, the hole diameter, the hole type, the number and layout of holes, the orientation relative to the pivot, and the tolerance on spacing and diameter. The clearest format is a dimensioned drawing or CAD file, and the most reliable is a physical sample of the existing hinge. A photo helps but should not be the only reference, because it cannot carry exact spacing or tolerance.





 English
  한국어
한국어  Русский
  Español
  Italiano
  Deutsch
  Français
  Português